ATN apps
drag & drop mobile app builder
Knowledge Base
Welcome to our Support Center! Whether you are an accomplished app master or simply taking your first steps into the exciting business of app development, our support center is the ultimate playground for you! Check out our collection of How To guides, FAQ and find the resource that best fits your expertise and needs.
How-To
With this feature you will be able to launch a “Uber-like service” with your app.
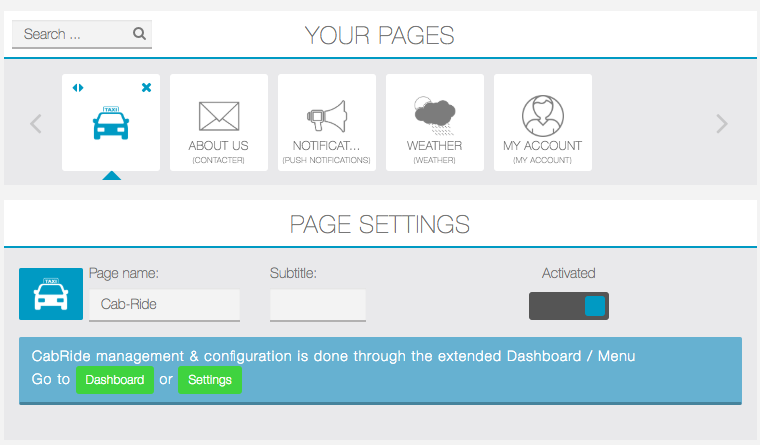
1. First, click on  in the “Add pages” part. This will appear:
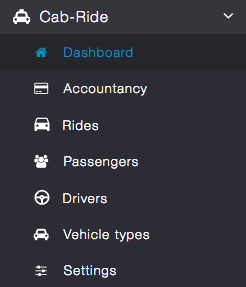
There are only shortcuts to the main Extended dashboard & menu now available on the left sidebar:
2. When you use the taxi template, whatever the Cabride module position is, it will be shown at the top of list:

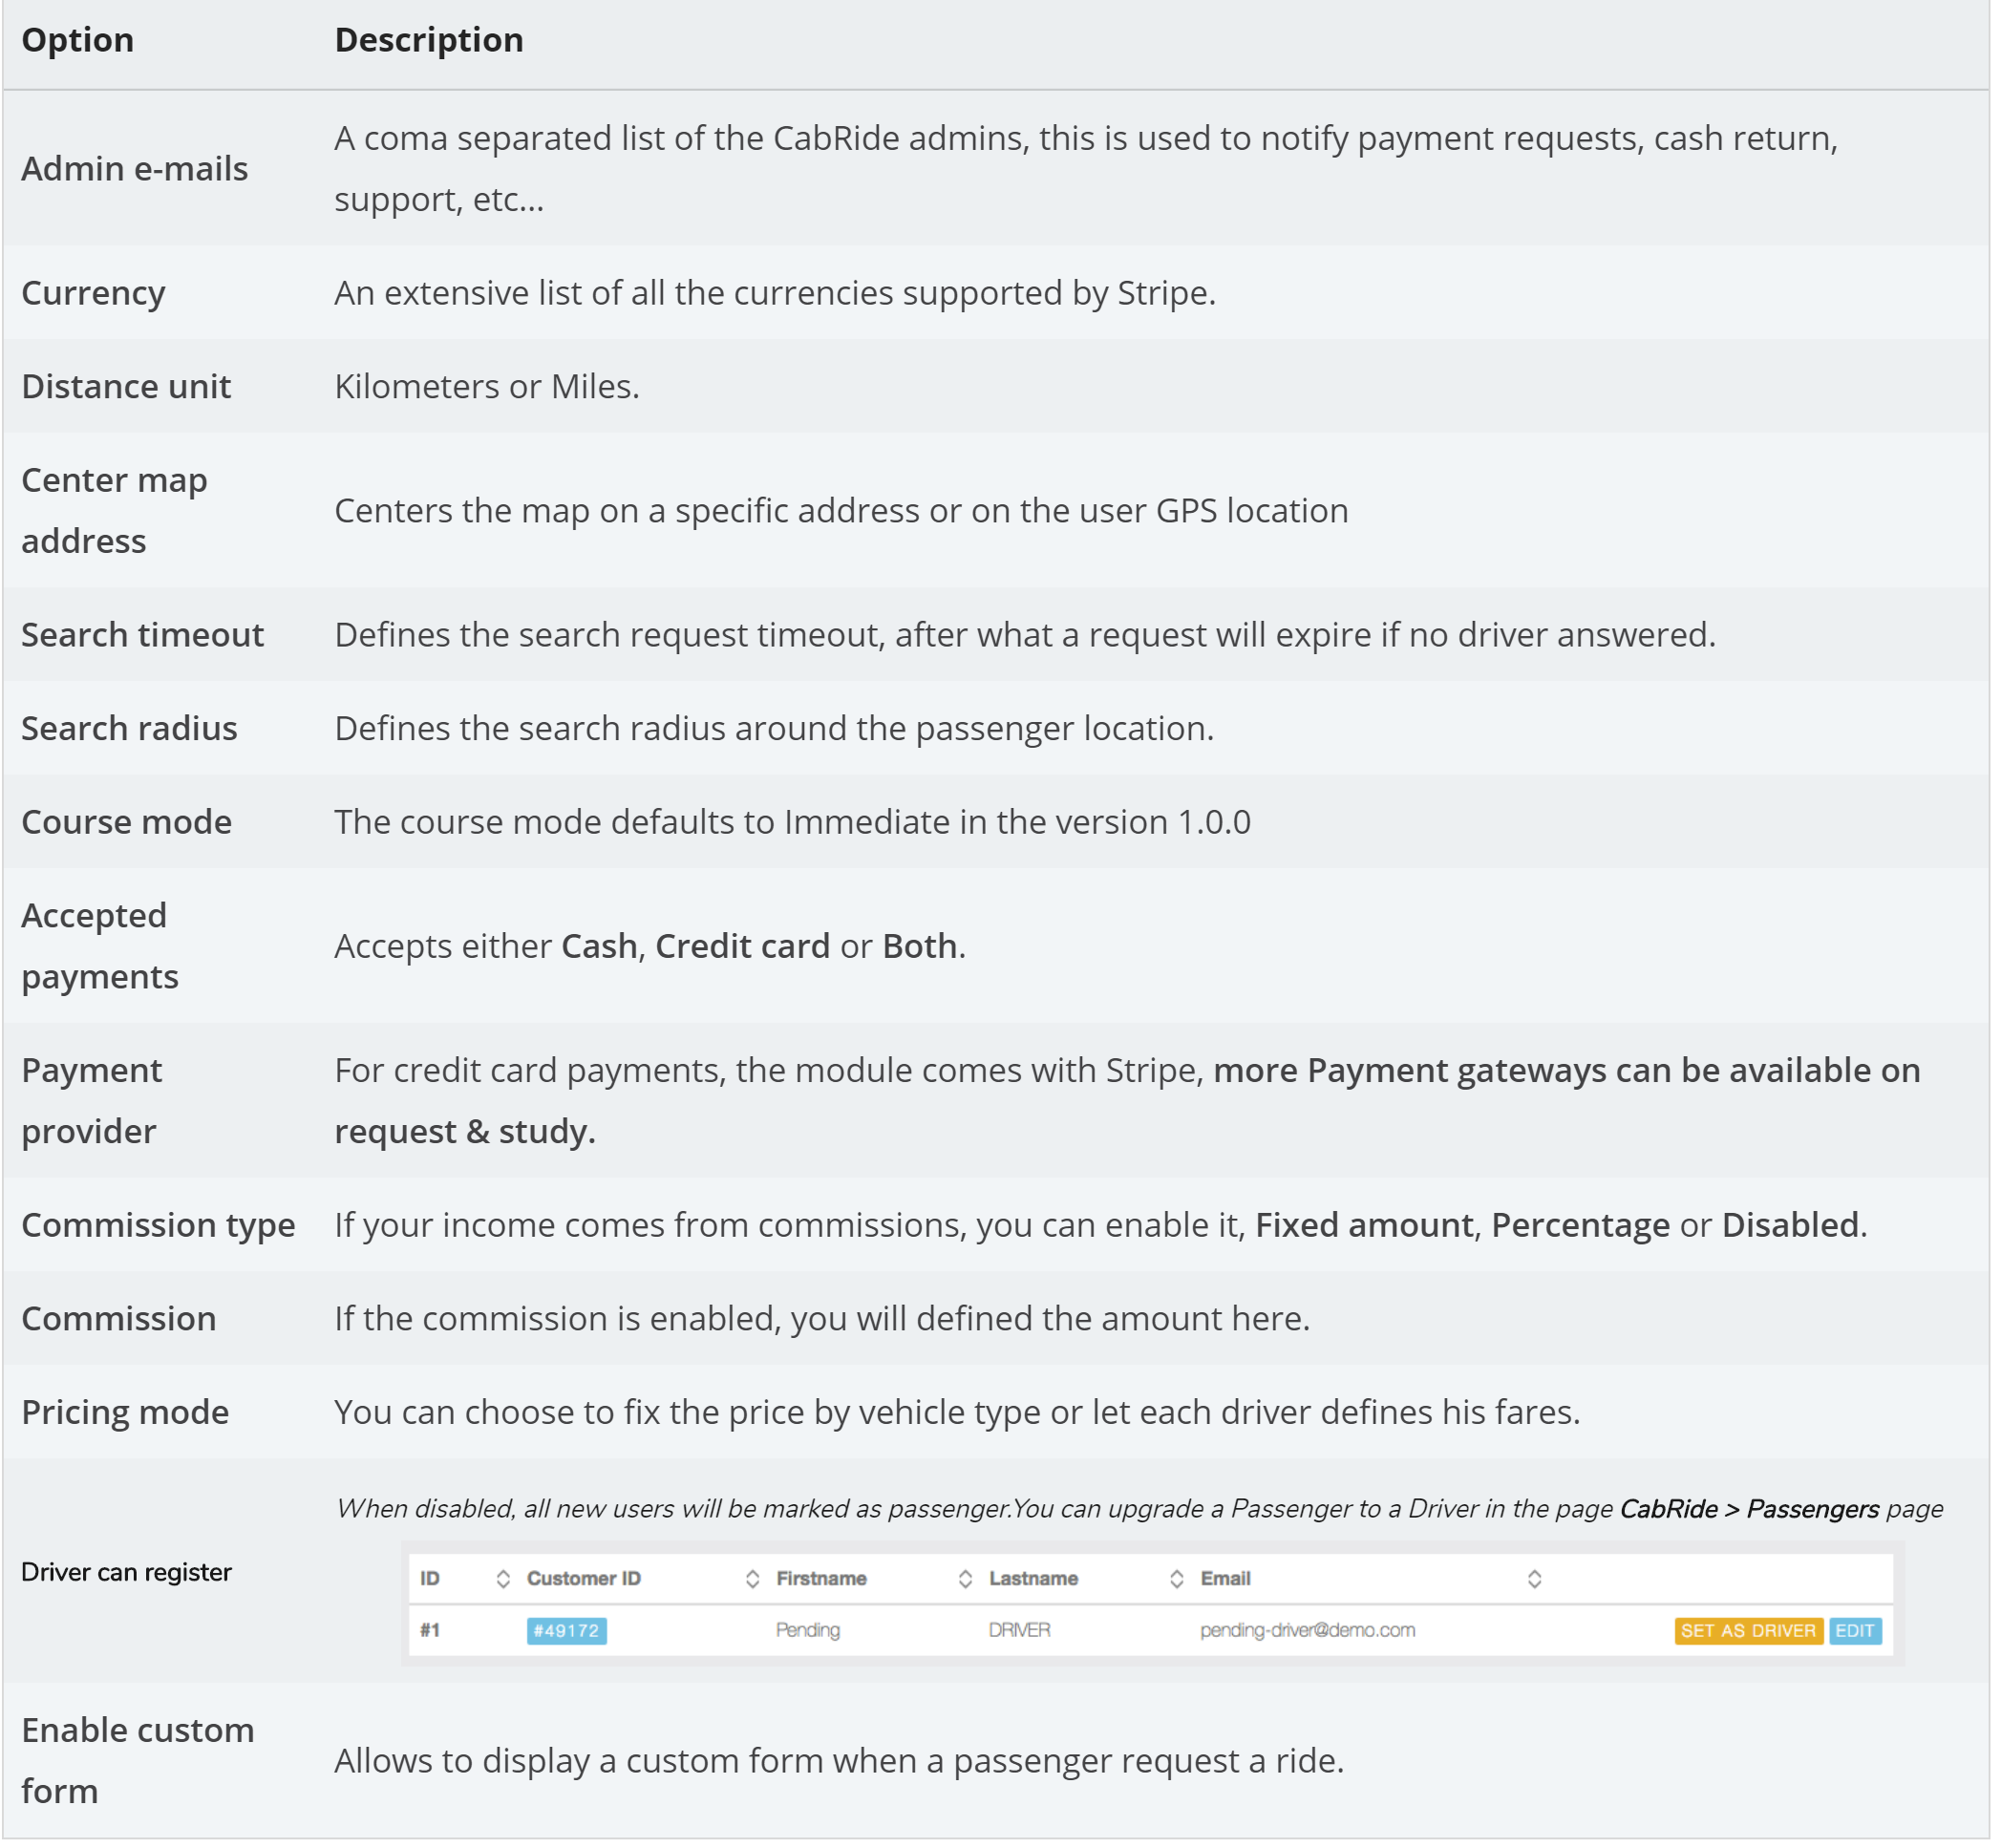
3. Open the Settings page to start with your module:
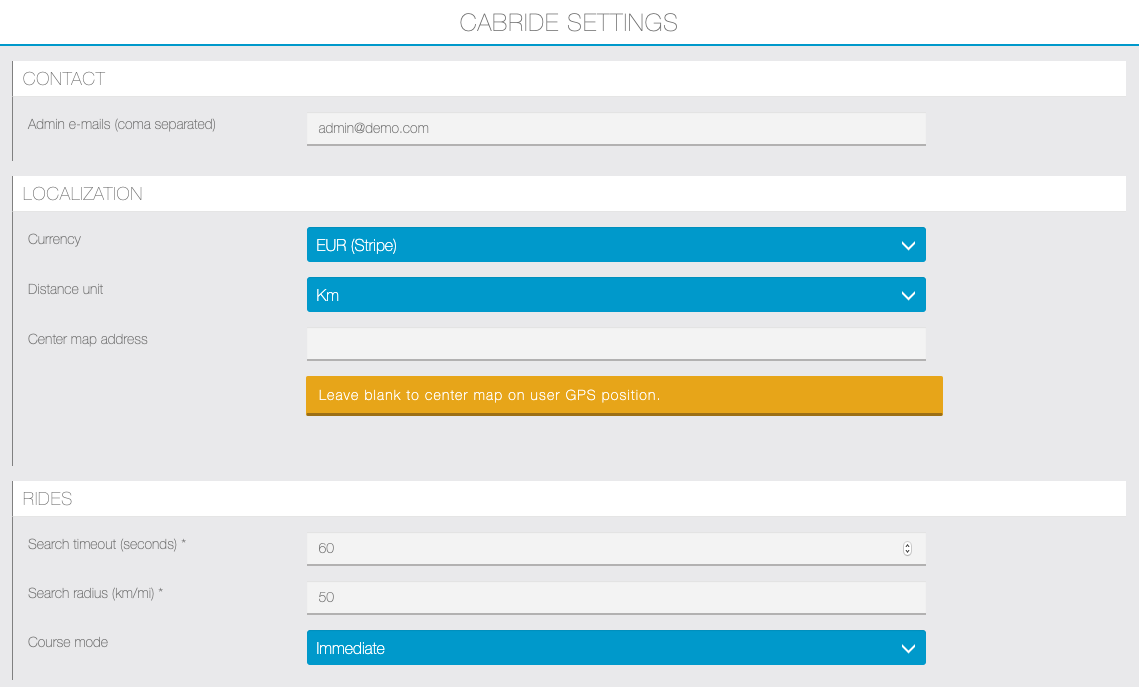
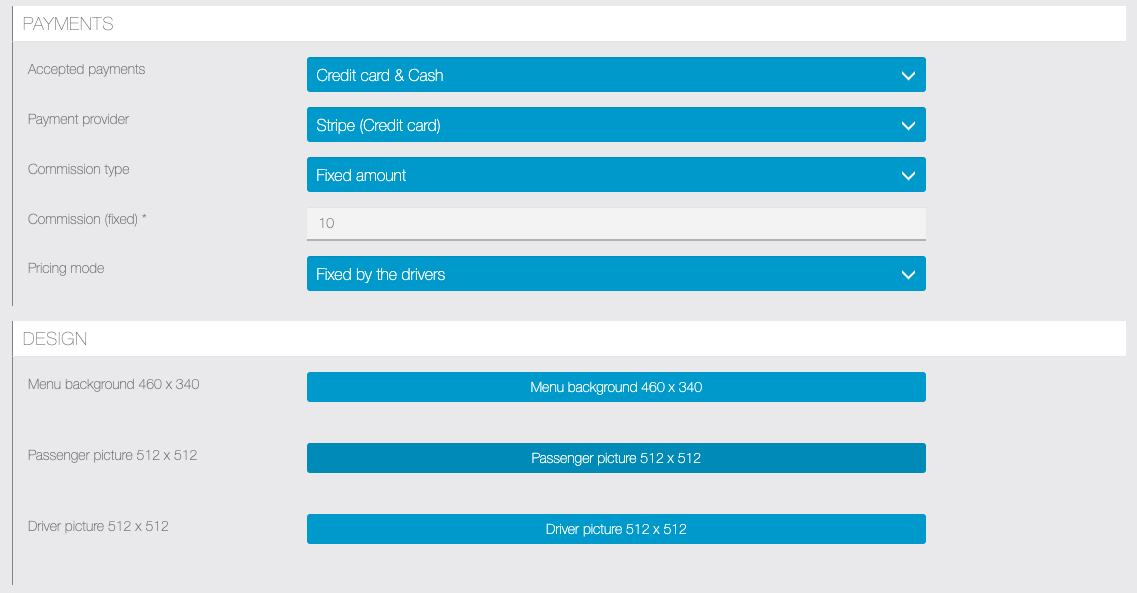

Description of the options:
When you are done with the settings, you will have to create at least one vehicle type.
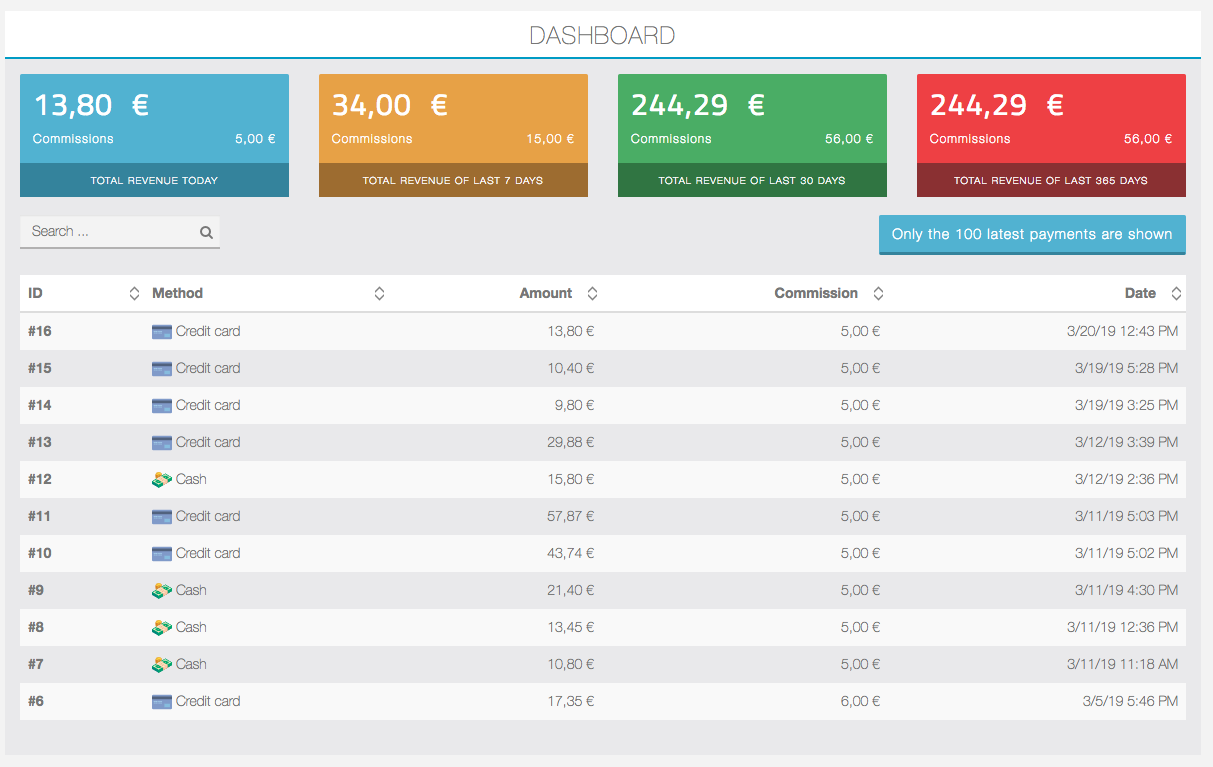
4. The CabRide > Dashboard
On the dashboard, you have access to a synthetic view of the latest 100 payments, and cumulative boards for daily, weekly, monthly & yearly earnings:
5. CabRide > Form
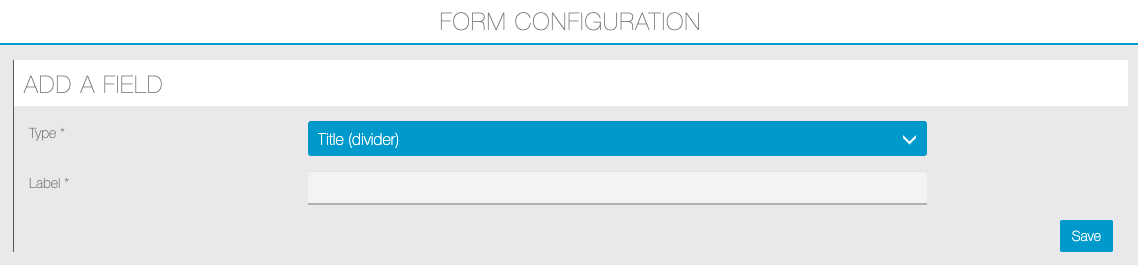
From this section you can create a custom form that will be displayed to the passengers when they request for a ride.
The answers will appear to the Driver in the detail of the ride request. Fields are grouped in two sections: Formatting elements and Input elements.
Let’s introduce the different fields.
Formatting elements
Title (divider): use it to create contrasting title/label elements.

White space (spacer): adds a 20px space between any other field.

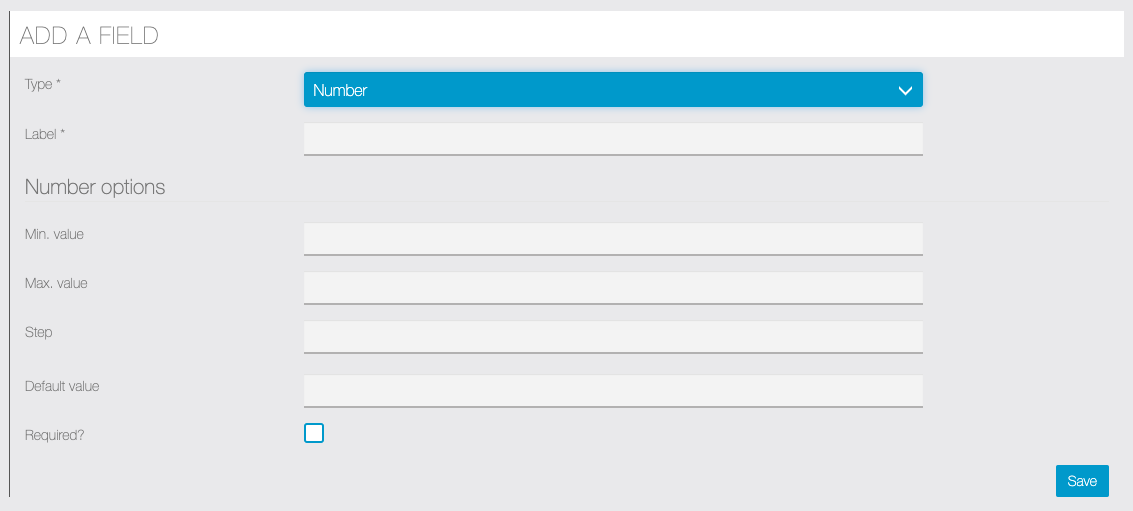
Input elements
Number: adds a number input with options, minimum, maximum & step increment.
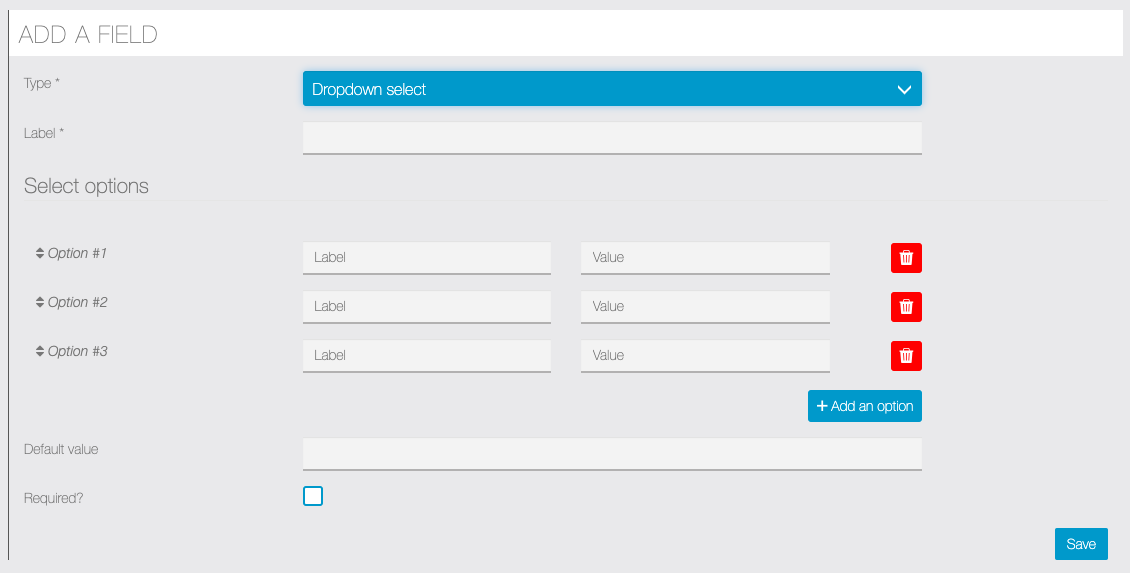
Dropdown select: adds a select element with multiple options.
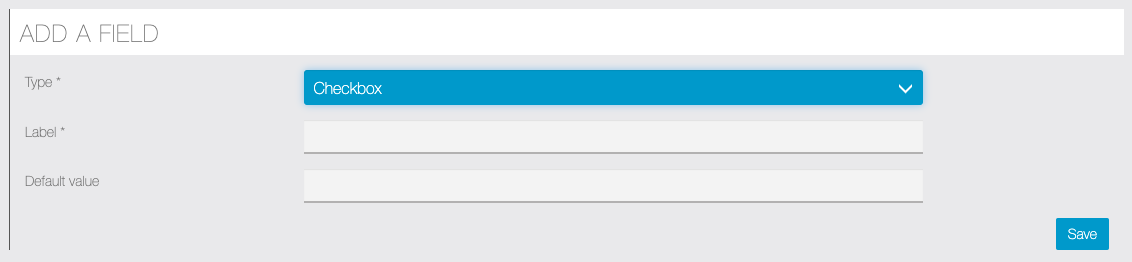
Checkbox: adds a simple checkbox element.
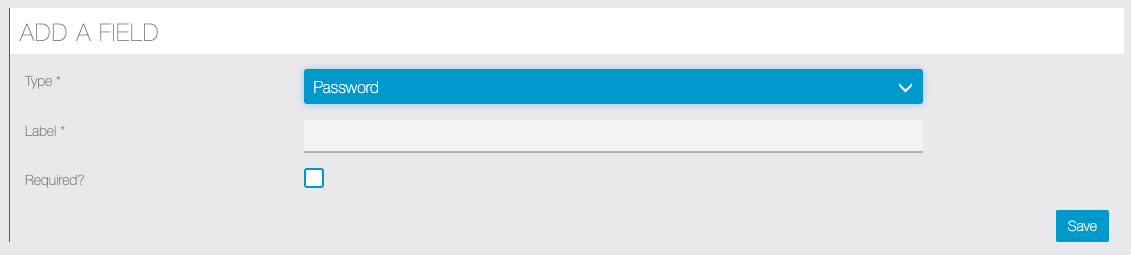
Password: adds a password text element, input text is not readable.
Text: a single line text input.

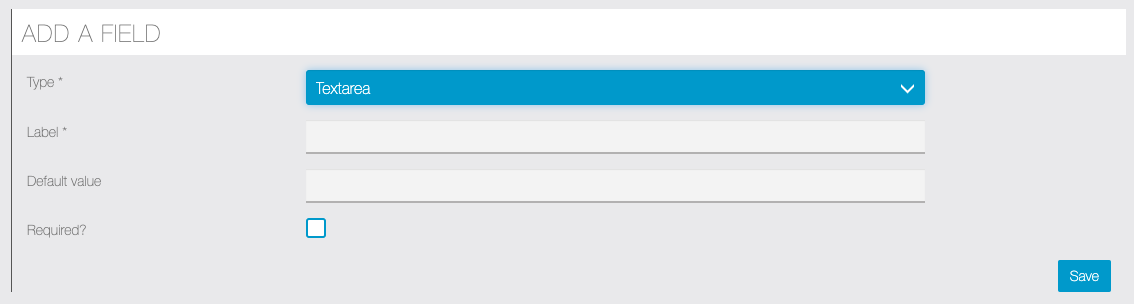
Textarea: a multiline text input.
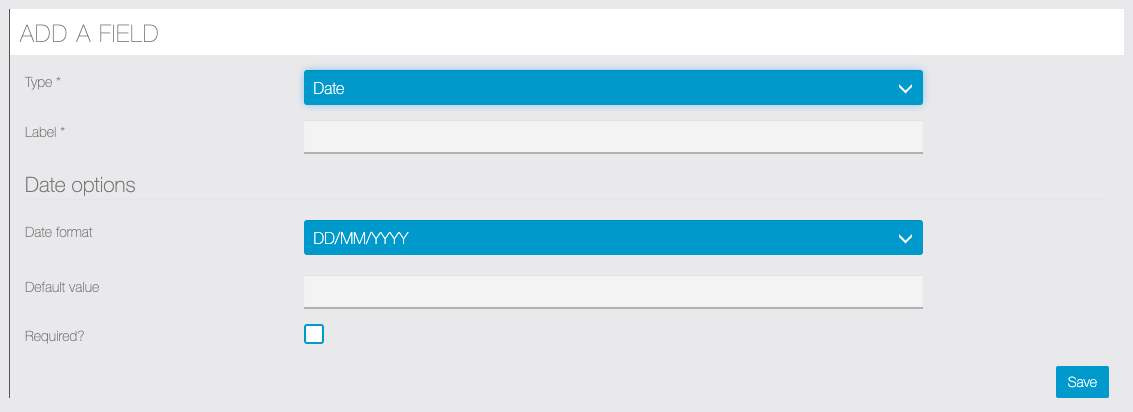
Date: simple date field, with format options.
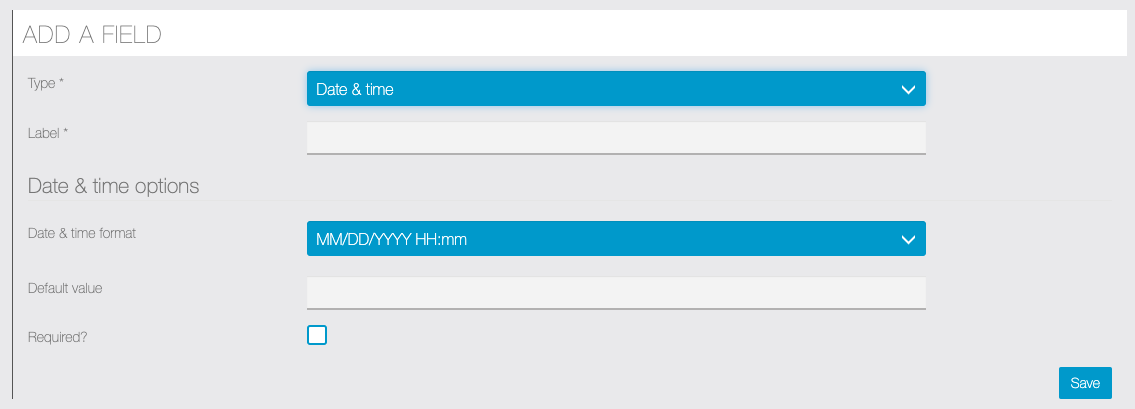
Date & time: simple date & time field, with format options.
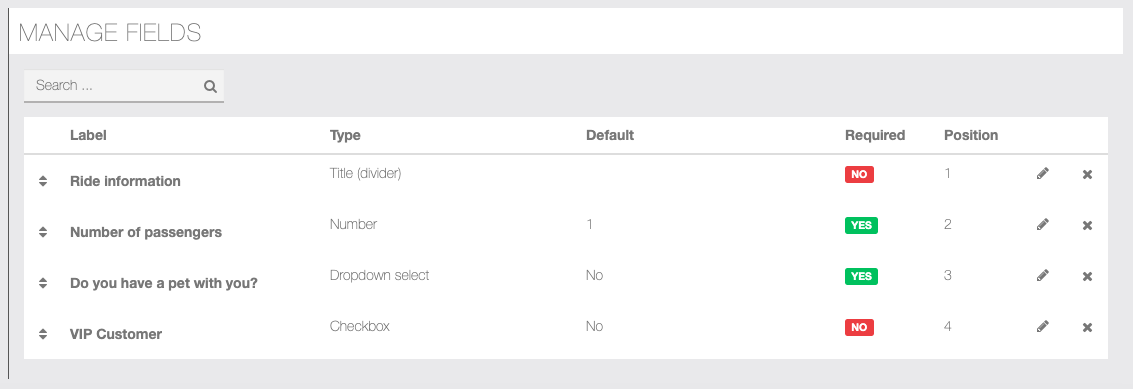
In Manage fields section you can edit the fields, change their order and delete them:
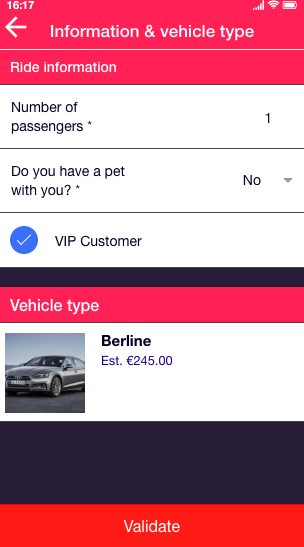
Here is an example of form in the app:
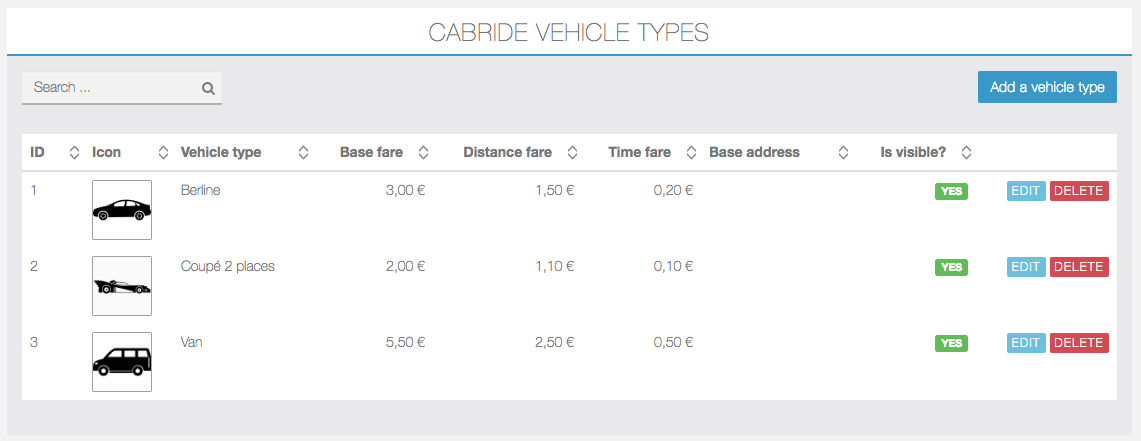
6. Open the page CabRide > Vehicle types
Then edit a vehicle type:
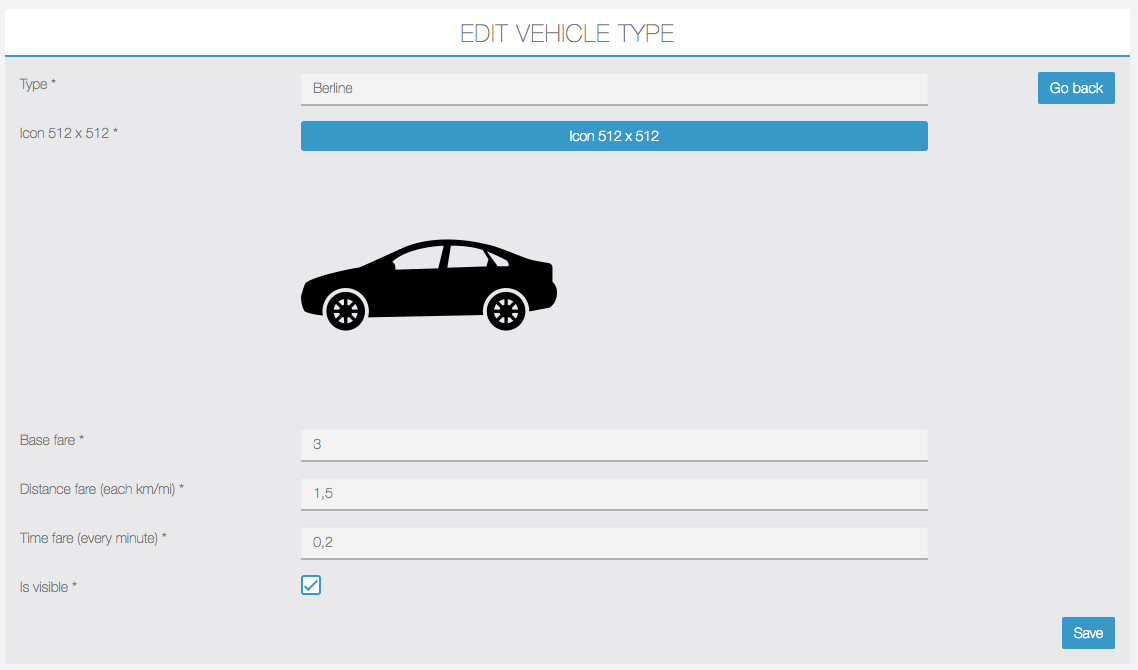
› Vehicle types require at least a Name & an Illustration.
› Fares are required only when Pricing mode is set to Fixed by vehicle type.
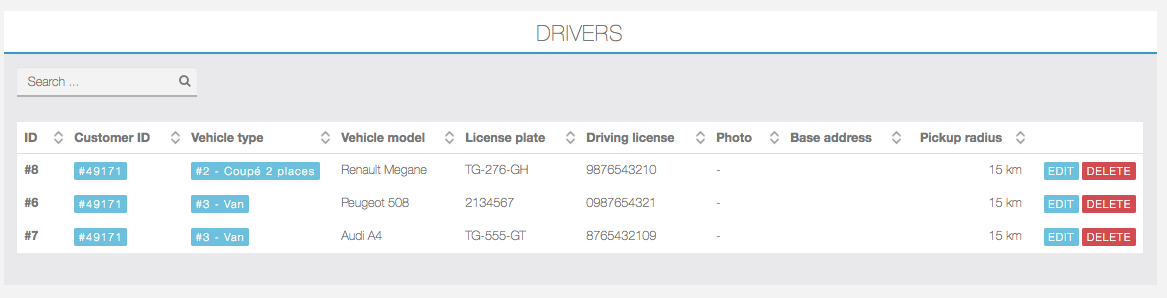
7. Then from CabRide > Drivers, you can manage & delete your drivers
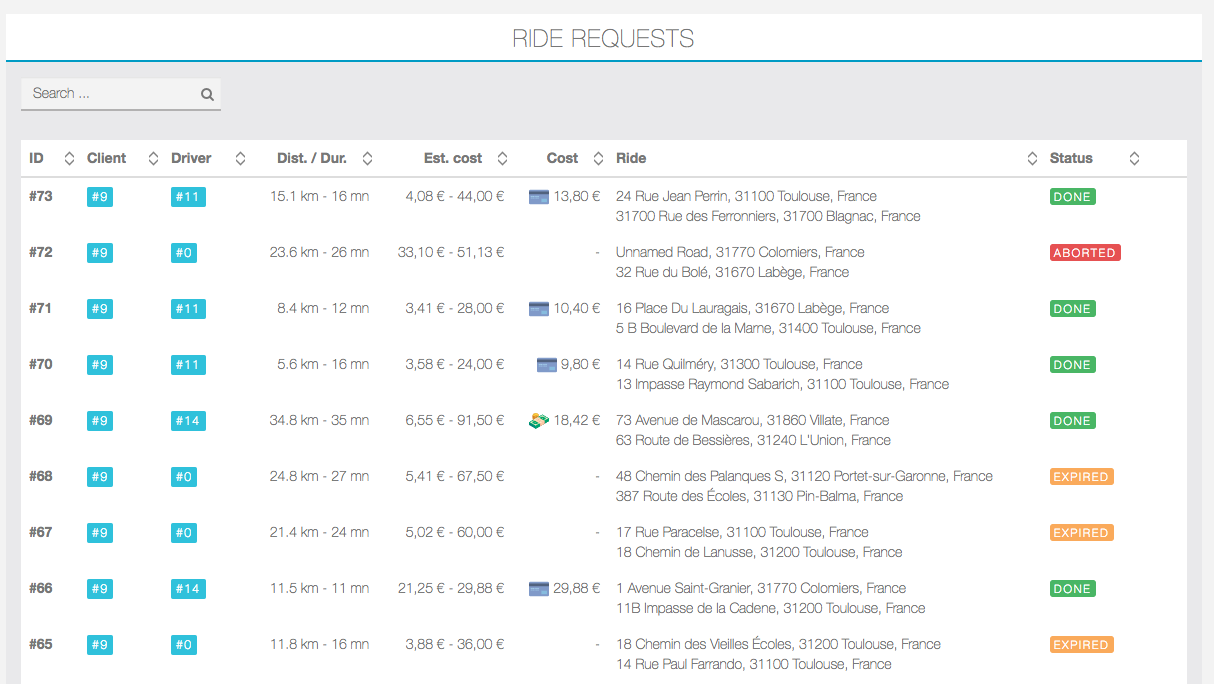
8. The page CabRide > Rides offers an overview of all the rides & requests, with their information and statuses.
9. From CabRide > Accountancy, you can manage your commissions payout & cash return requests:
- Cash return requests:
All rides paid with cash will be aggregated by drivers, grouping all payments with the sum of commissions to be returned:
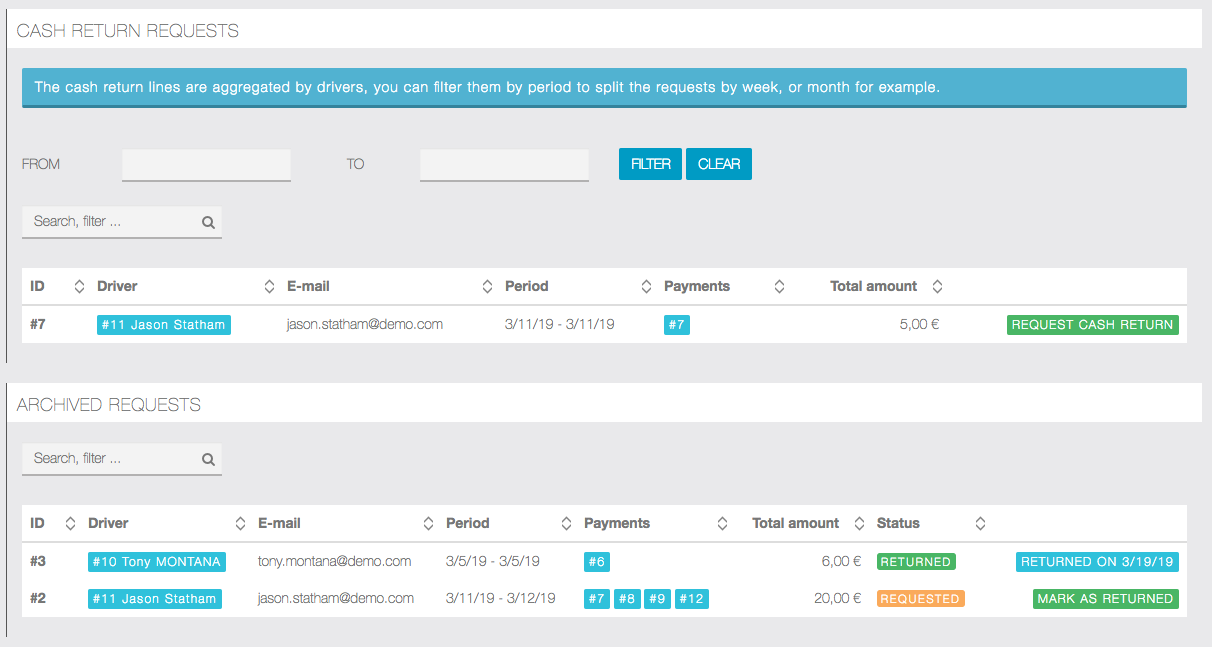
You can send cash requests to your drivers:
› Without date filters: all pending cash return will be aggregated regardless of the time period.
› With period filter: only rides paid by cash within the time period will be aggregated and asked for a return. When requesting a cash return, the line will be added to the Archived requests with the status REQUESTED, when the cash is returned, you can call the action MARK AS RETURNED to validate it.
2. Payouts
On the other hand, for payments done via credit card you’ll be able to create individual or bulk payout requests.

You can inform your drivers they will have their payouts processed:
› Without date filters: all pending payouts will be aggregated regardless of the time period and drivers will be notified.
› With period filter: only rides paid by credit card within the time period will be aggregated and notified as payout in progress to the drivers.
› The  action will create a pending payout for the given driver payouts.

The  action will create a bulk csv export for all the pending payouts (filtered by time period, or not).
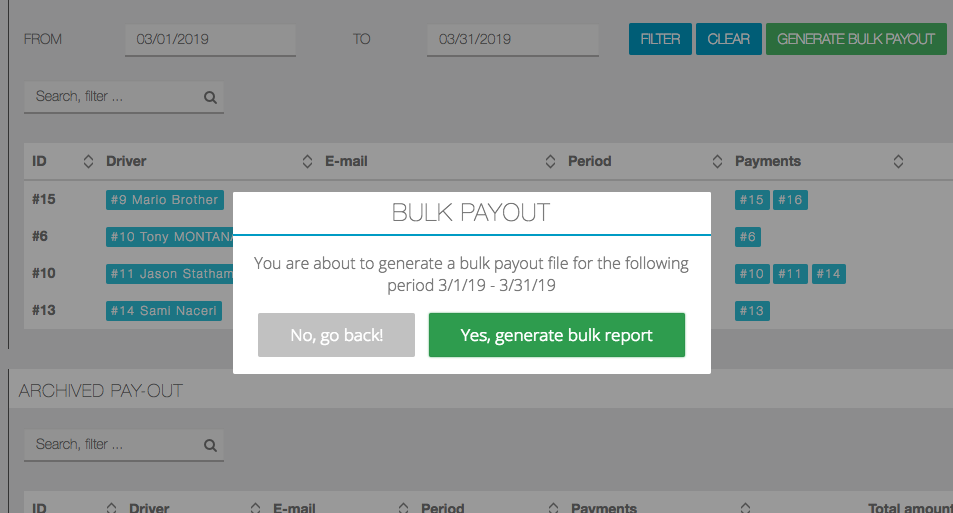
When the bulk report generation is done, you’ll see the report, and will be able to download it as CSV:

Passenger side
First, you have to create an account, whether you are a passenger or a driver. When you create the account, you have to choose between Passenger and Driver. Be careful, once you have created this account, you can not change your status. Passengers are automatically validated, whereas Drivers have to be validated by the admin.

› If the setting Driver can register is not enabled, all new customers will be marked as passenger. It’s then up to the app admin to grant customers as drivers from the page CabRide > Passengers with the action 
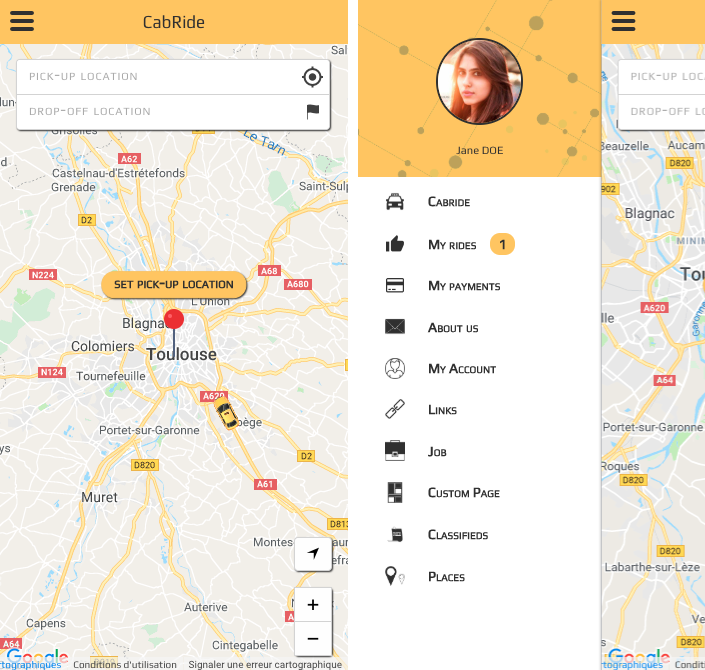
- Passenger UI
- The passenger homepage with a nearby online driver (yellow cab on the map).
2. The homepage when the passenger defined a pick up address and your drop off address, with estimated distance & duration.› At this step, the passenger can now start a search request for available drivers.
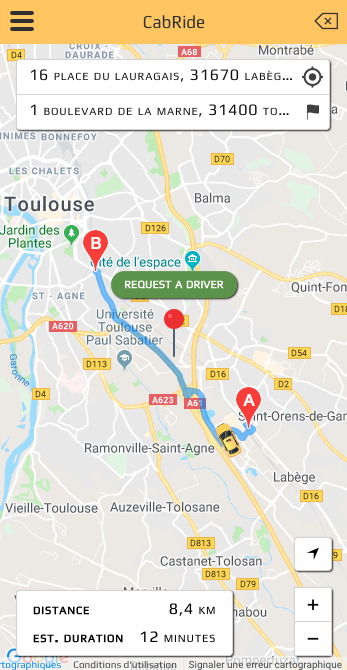
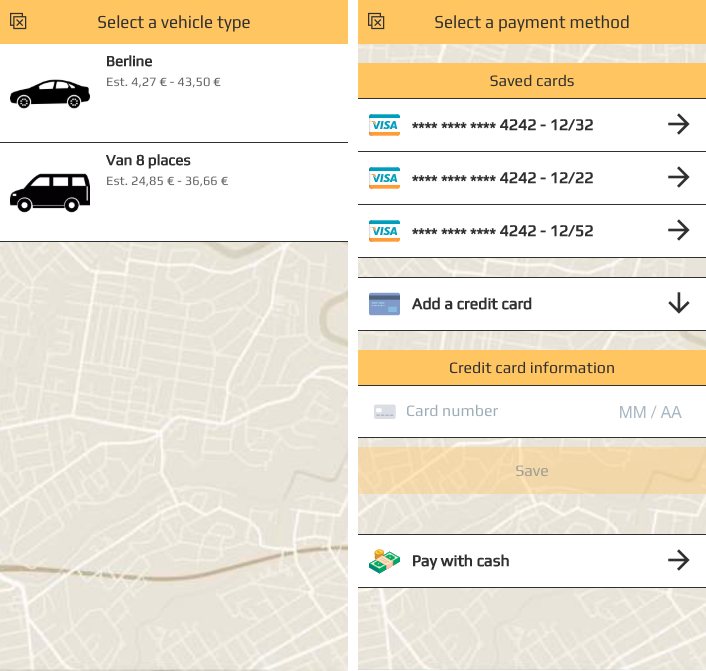
› When the search is successful, the passenger will have to choose between the available vehicle types, If multiple drivers are available, a price range is shown to inform the passenger. When only one driver is available for a vehicle type, a single cost is shown.
› After the passenger selected a vehicle type, he will have to select a payment method
› Passengers can securely vault one or more credit card to be used later easily.
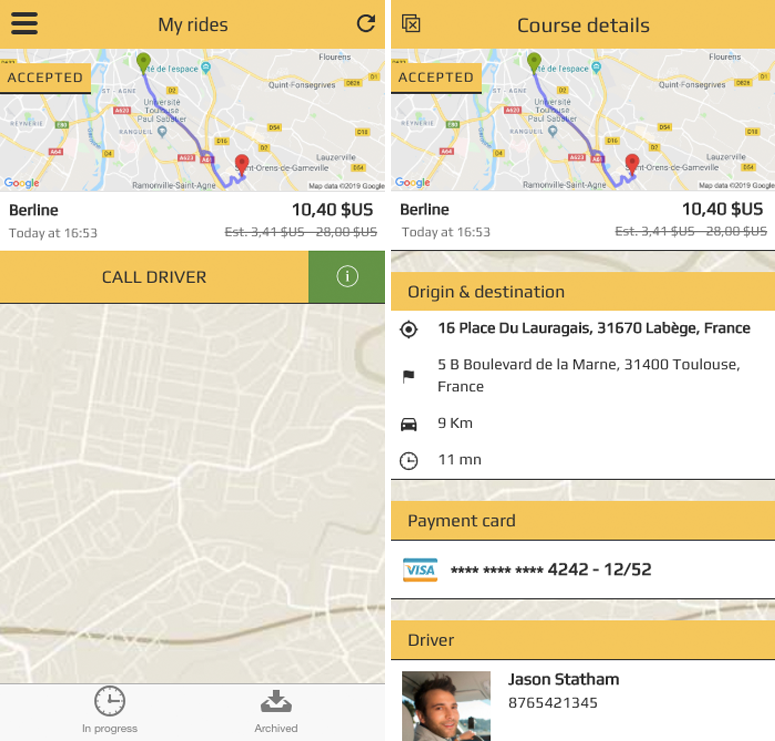
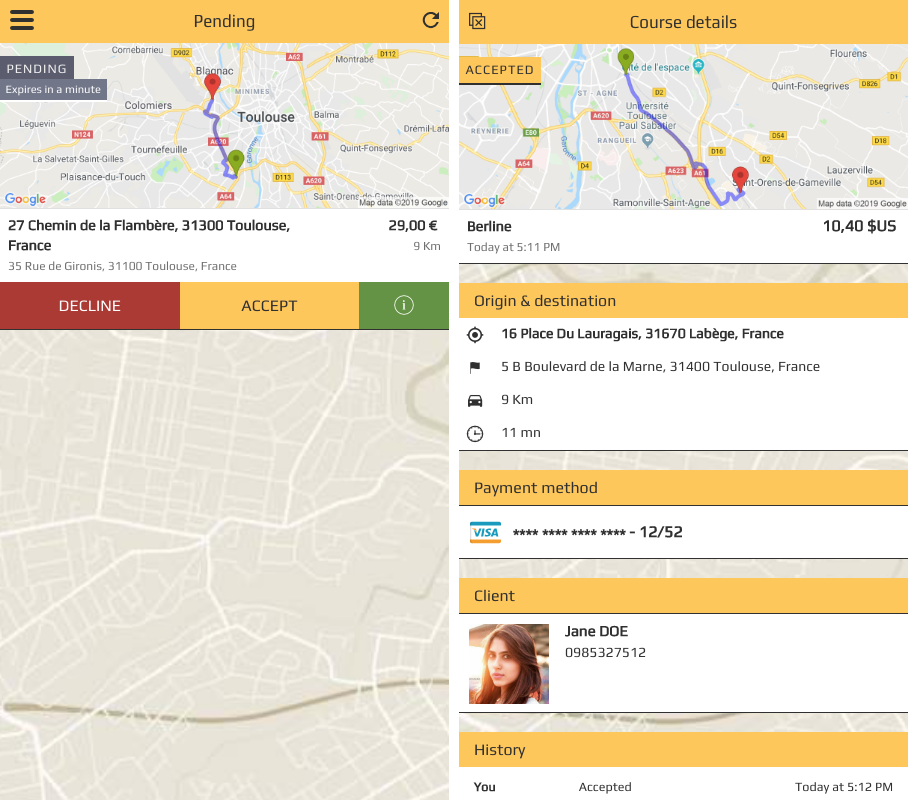
3. After selecting a payment method, the passenger will be directed to the page My Rides› The ride is Pending while waiting for drivers to accept, the expiration delay is shown.
› While the request is in Pending state, passenger can still cancel it.

4. If a driver accepts the ride, passenger will receive a push notification and the ride state will change to accepted›
› At this step, the passenger can make a phone call to the driver if needed, or see more details ![]() about the ride.
about the ride.
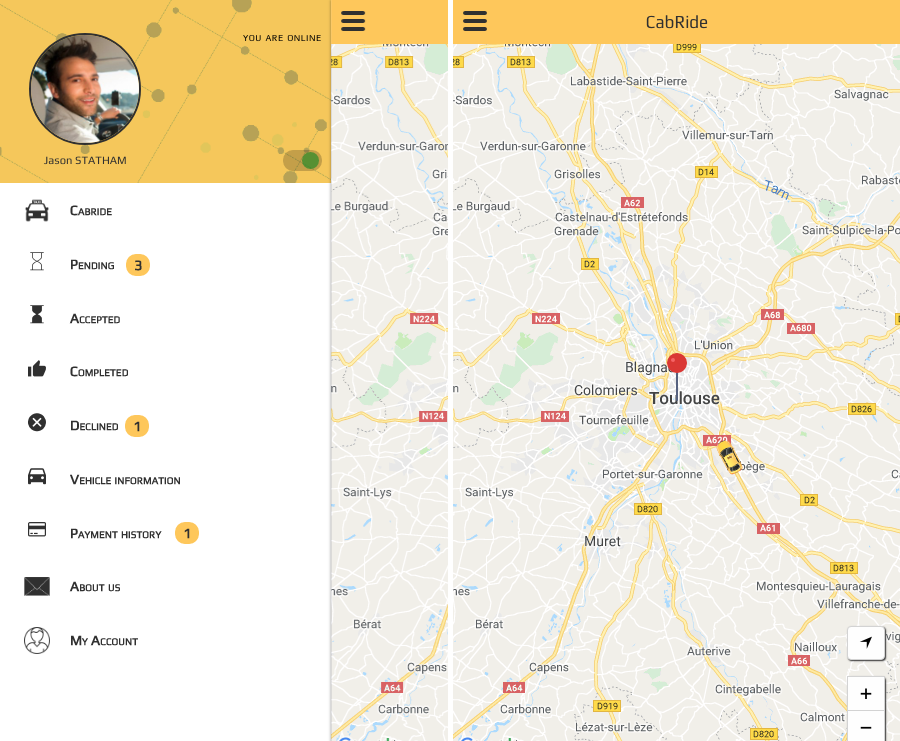
2. Driver UI
1. Driver nav & waiting homepage, next to each section, a counter shows how many requests or actions are yet active.
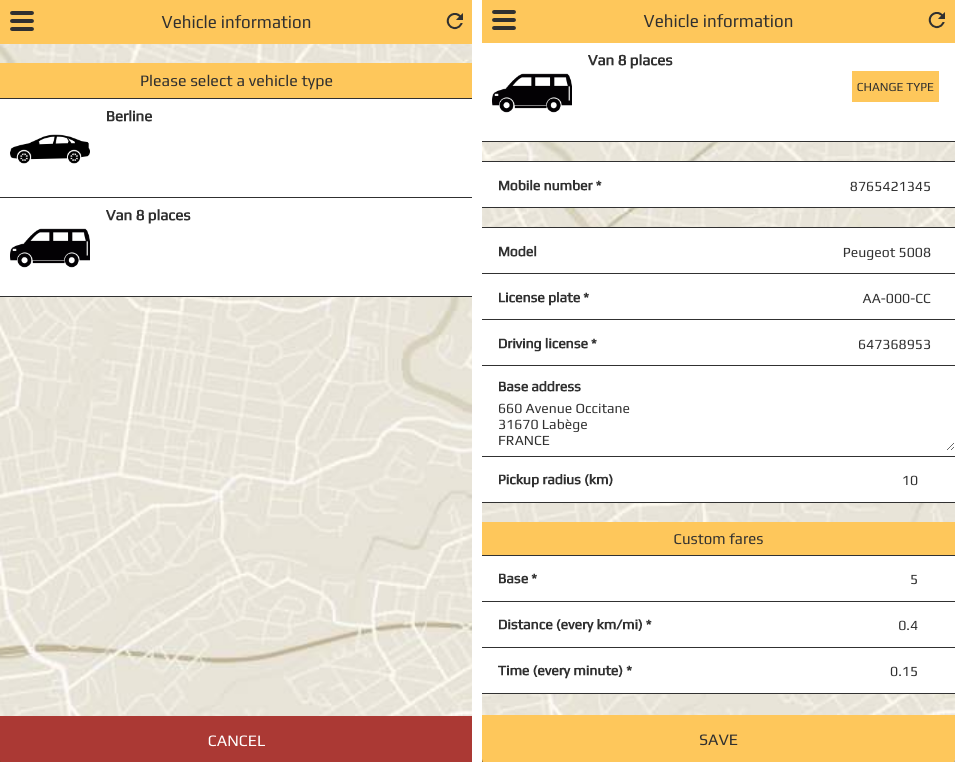
2. Vehicle information.
› The driver will have to select a vehicle type, and fill information before going online.
› The section Custom fares is only visible & editable when the setting Pricing mode is set to drivers.
› With this pricing mode, drivers will fix their fares individually.
3. While waiting for rides, drivers will receive push if they match any request, the push will open the Pending page:
› Here the driver can review the ride request while pending, and Decline or Accept.
› When the driver Decline a ride, the ride will be moved to the Declined page, the driver can still accept it, if it’s not expired or accepted by another driver.
› When the driver accepts the ride, the passenger will receive a push, and the driver will get more information.
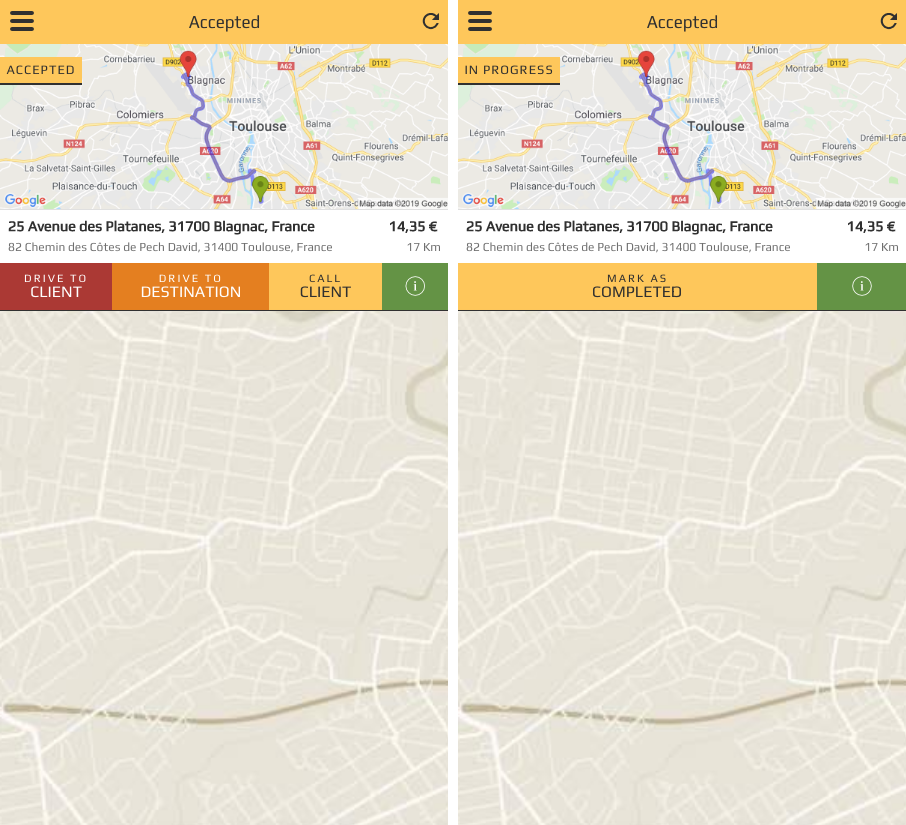
4. After the driver has Accepted a ride, he will have new actions
› Drive to client: The driver will inform the client he is on his way, the passenger will be informed of the estimated time of arrival of the driver.
› Drive to destination: The passenger is now on-board, and the driver starts the ride.
› Call client: The driver can call the client for more information.
5. Both Drive actions will open a navigation intent to choose between Waze, Google directions, or Apple maps for iOS devices.
6. When the ride is done and the passenger arrived at destination, the driver will be able to mark the ride as completed.
› If the passenger is paying by card, the card will be charged the course total.
› If the passenger is paying with cash, he pays the driver directly.
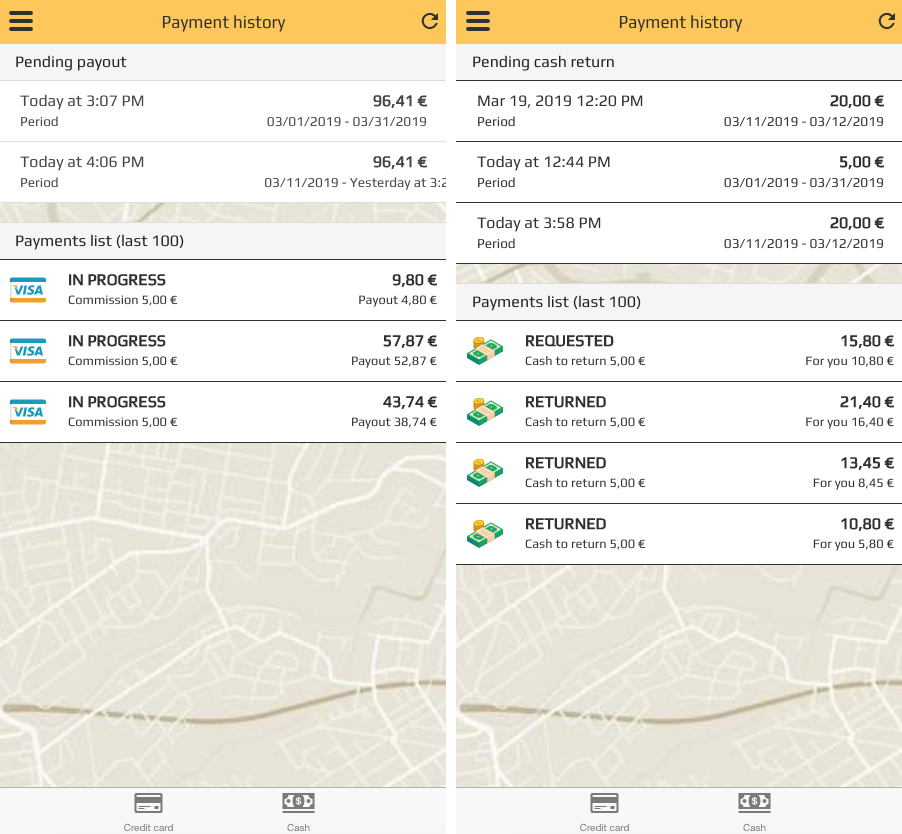
7. After rides are done, the driver can review his payment history:› The Payment history page is split in two sections:
-
Credit card
-
Pending payouts:
When the app admin mark payouts as pending, the driver will see his incoming payouts, with the total amount due, and the period covered. -
The latest 100 payments are displayed with their respective statuses:
-
UNPAID = The payout is due to the driver.
-
IN PROGRESS = The app admin marked this payment for an incoming payout.
-
PAID = The payout is paid.
-
-
-
Cash
-
Pending cash return:
When the app admin mark cash payments to be returned, the driver will be notified he has pending cash return requests, with the covered period and the total amount to return -
The latest 100 payments are displayed with their respective statuses:
-
UNRETURNED = The cash is pending.
-
REQUESTED = The app admin requested a cash return for this payment.
-
RETURNED = The commission for this payment is marked as returned.
-
-
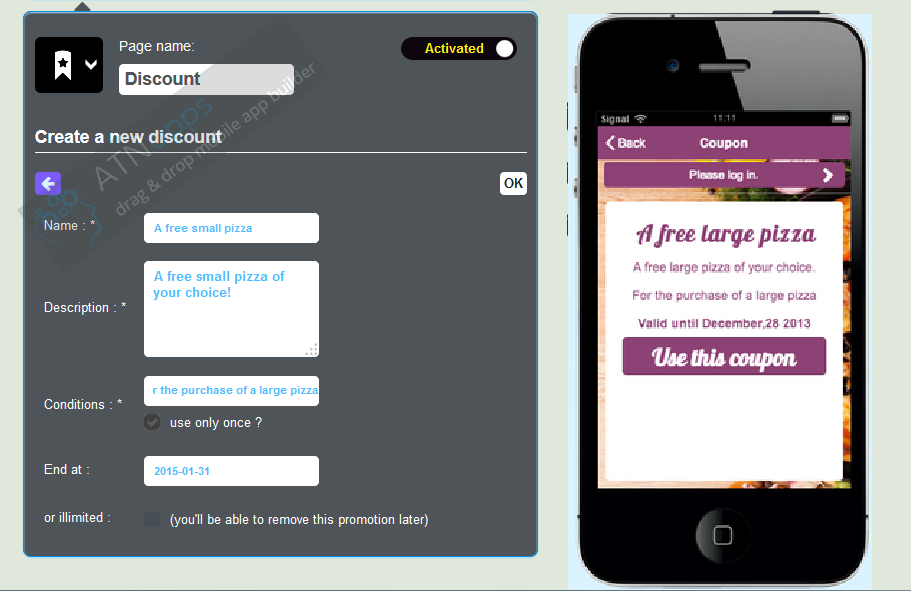
Here are the various parts of a discount:
- Title: for example "One free coffee", keep it short and simple
- Description: for example : "One free coffee among classical L and XL coffees"
- Conditions: for example : "Available for a $10 order"
- Can only be used once: tick this if you want the discount not to be available for the client anymore after he has used it. A "use this discount" button will appear in the application and the client will have to press it to use the discount.
- End date or unlimited: choose if you want your discount to have an end date or if you want it to be unlimited and to stop it when you want.
- Publish it on my Facebook Wall: if you already have activated "Publish on your Facebook fan page" in the "Extra" section, you'll be able to share each discount on the retailer's Facebook fan page.
Here is what it looks like:
To enter a new discount, click on ![]() and repeat the process.
and repeat the process.
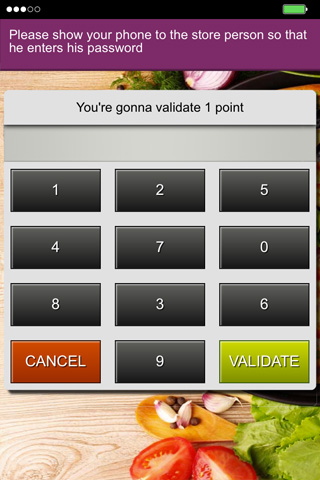
To validate a loyalty point the business owner will have to enter a four-digit password. As with loyalty stamp card, the client has to show his card to the retailer for stamping it, with our digital loyalty card, the client has to show his smartphone and the retailer has to enter his four-digit password to validate a point.
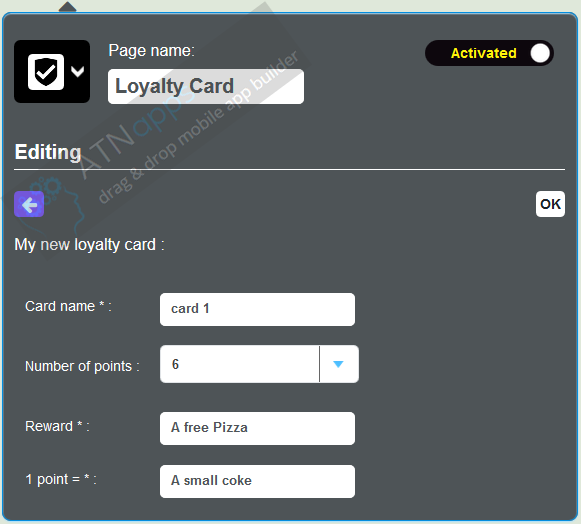
1. Loyalty card creation
Here are the things needed to create a loyalty card:
- the total number of points
- the reward
- what's the condition to validate a point
Here is an example:
2. Four-digit passwords creation:
It is possible to create a password for each employee. Like this it will be more easy to verify who validate what.
To create a password, you just have to click on the 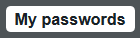 button:
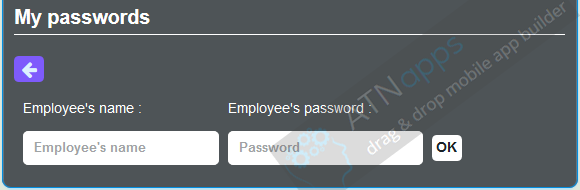
3. The loyalty card in the application:
To validate a point, the client “touch” a point and shows his smartphone to the retailer:
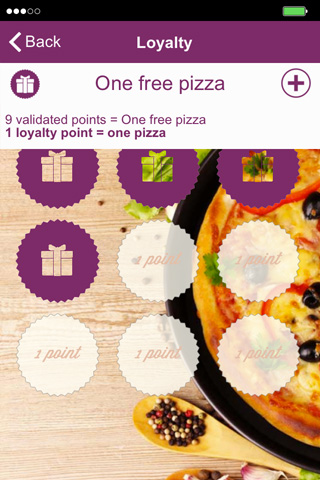
The retailer chooses the number of points and enter his password :
Here are the various parts of a discount:
- Title: for example "One free coffee", keep it short and simple
- Description: for example : "One free coffee among classical L and XL coffees"
- Conditions: for example : "Available for a $10 order"
- Can only be used once: tick this if you want the discount not to be available for the client anymore after he has used it. A "use this discount" button will appear in the application and the client will have to press it to use the discount.
- End date or unlimited: choose if you want your discount to have an end date or if you want it to be unlimited and to stop it when you want.
- Publish it on my Facebook Wall: if you already have activated "Publish on your Facebook fan page" in the "Extra" section, you'll be able to share each discount on the retailer's Facebook fan page.
Here is what it looks like:
To enter a new discount, click on ![]() and repeat the process.
and repeat the process.
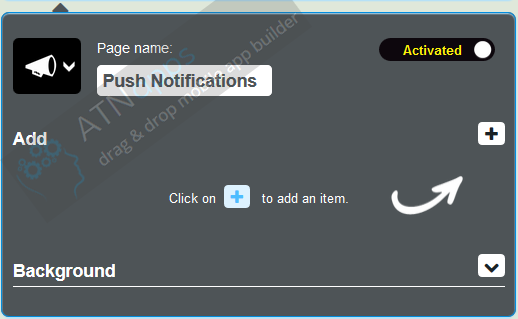
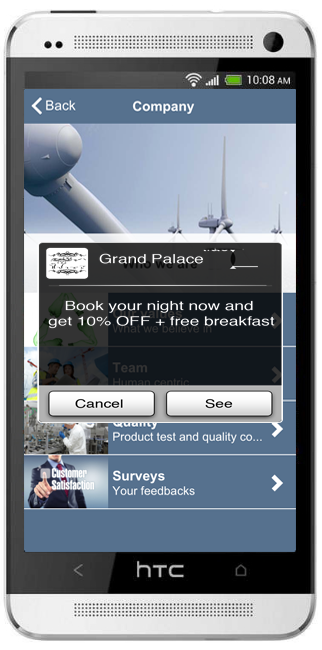
It is quite simple. First of all, you have to click on the Push feature. This will appear:
Then, you have to click on the ![]() , to create a new Push message. This will appear:
, to create a new Push message. This will appear:

Now, choose your message an click on ![]() , Once you have click, this will appear:
, Once you have click, this will appear:
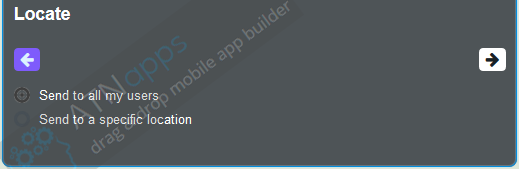
This option allows you to choose if you want to send your notification to all your users or only the ones who are in a specific location.
Case 1: Send a notification to all users
Click on "Send to all my users" and then click on ![]() , This will appear:
, This will appear:
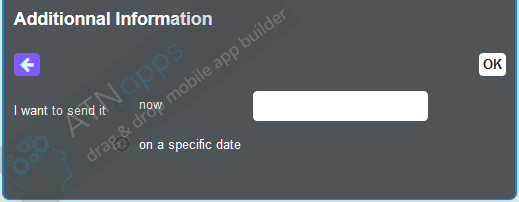
It enables you to choose if you want to send your notification now or on a specific date. If you choose "now", you only have to click on ![]() to send your notification.
to send your notification.
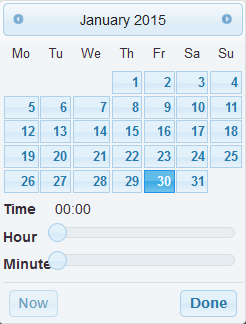
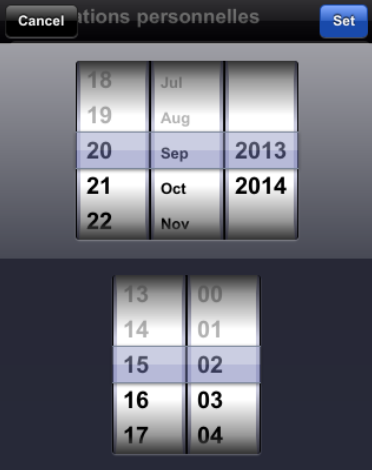
But if you want to send your notification on a specific date, this calendar appears:
 .
.
Choose in the calendar the day and hour you want your notification to be sent. Then click on ![]() to validate your choice.
to validate your choice.
Finally click on ![]() to validate your notification. Your notification will be sent at the moment you choose.
to validate your notification. Your notification will be sent at the moment you choose.
Case 2: Send a geolocated notification
If you want to send a geolocated notification, click on "Send to a specific location". This option enables you to only target people who are in a specific area. Once you have click, this will appear:
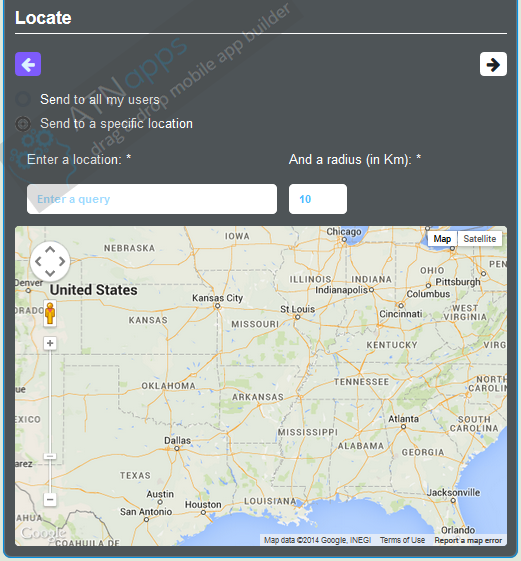
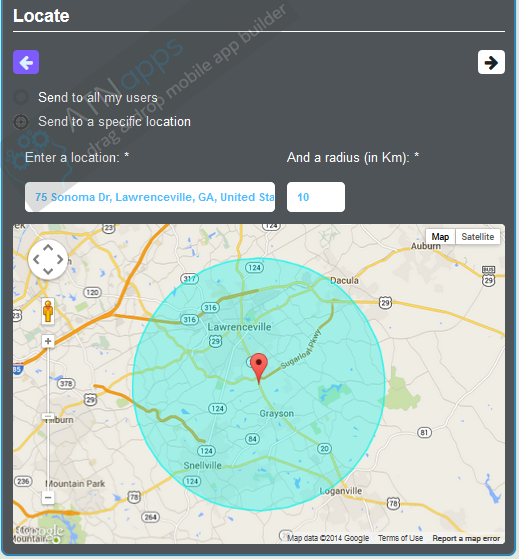
Here, you can choose where you will send you notification. Enter an address, then enter a radius in which users will receive the notification.
Here an example:
Once you have done that, click on ![]() to go to the next step. This will appear:
to go to the next step. This will appear:
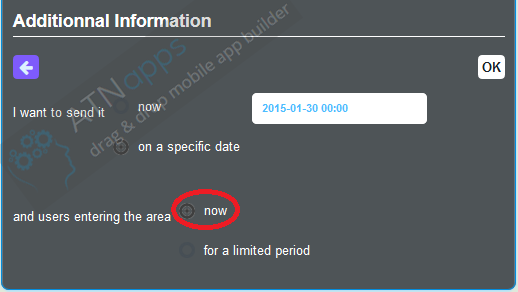
Like in case one, you can choose if you want to send your notification now or on a specific date.
If you only choose to send your notification to users in the selected area at a selected moment, click on "now" and them click on ![]() .
.
Finally click on ![]() to validate your notification. Your notification will be sent at the moment you choose.
to validate your notification. Your notification will be sent at the moment you choose.
Case 3: Send a geolocated notification to users in the area and the ones that will enter it during an amount of time
To send this kind of notification follow the same process than in case 2. Then when "Additional Information" appears, click on "for a limited period".
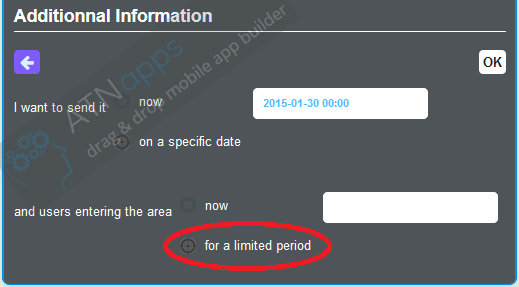
Here again a calendar appears:
Choose your campaign ending date in this calendar. Select the day and hour and then click on ![]() to validate your ending date.
to validate your ending date.
Finally click on ![]() to validate your notification. Your notification will be sent at the moment you choose.
to validate your notification. Your notification will be sent at the moment you choose.
You can obtain this:
Little warning: if you have menus don't create them with this feature but use the "menu" feature instead which is more appropriated.
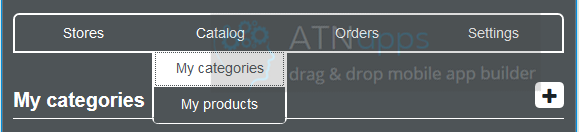
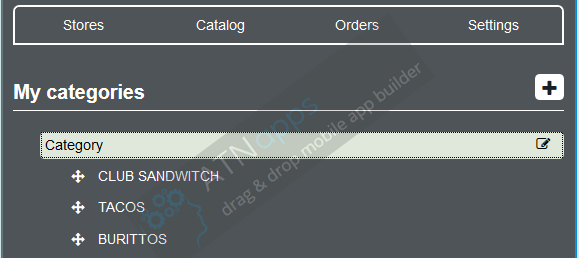
1. Create a main category (click on  ):
):
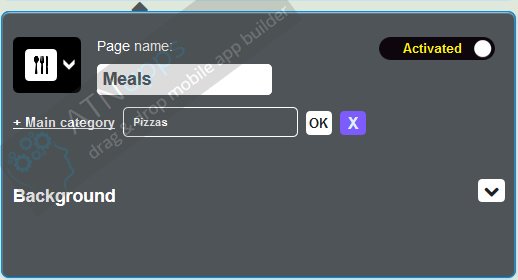
2. You've got 2 options:
- to create a sub-category if needed (by clicking on
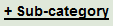 ) :
) :
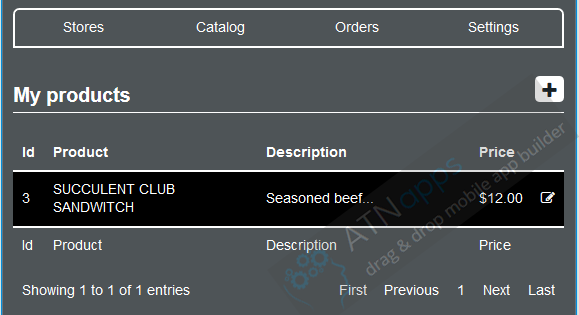
- or to create directly a product (by clicking on
 ) :
) :
Notes :
- You can create all you main categories first, then all your subcategories and finally all your products in the appropriate subcategories.
- You can drag and drop all your subcategories (in a same main category), and your main categories by clicking on
 and dragging the category/subcategory/product.
 - If you just want to create a listing without prices, just enter no price in the price field.
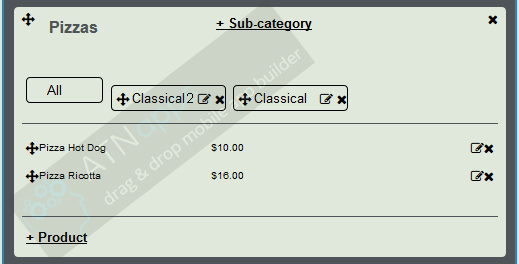
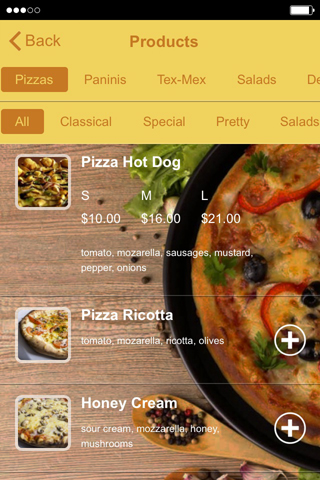
An example of a subcategory order modification:
The subcategory "Classical" is 1st:
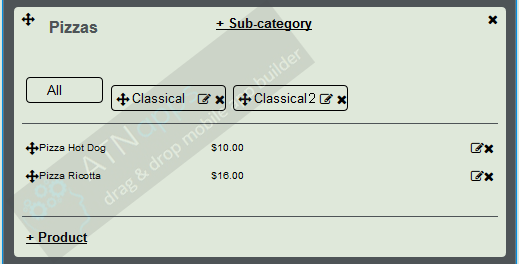
The subcategory "Classical" is 2nd:
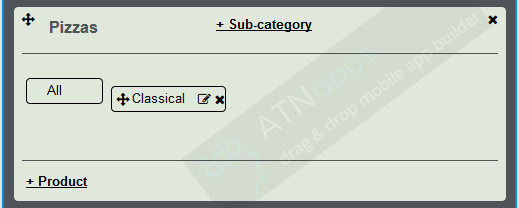
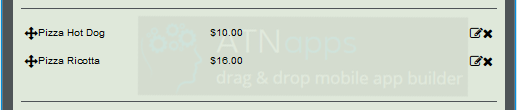
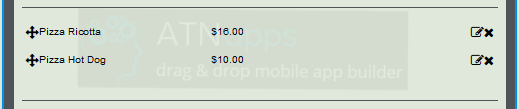
You can re-order the same thing with Products:
"Pizza Hot Dog" is 1st:
"Pizza Hot Dog" is 2nd:
You can obtain this:
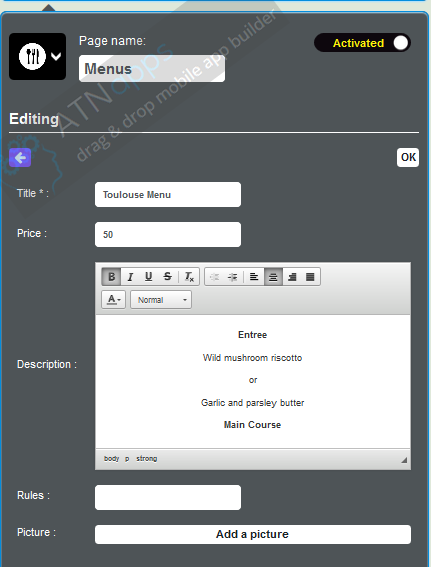
Necessary components:
- Menu name, for example: "Evening menu", or "Family menu"
- Price. This field isn't mandatory, as you can enter the price in the menu description
- Description: you're going to use the text editor to create a menu. Look below to see how creating a beautiful menu.
- Conditions. This field isn't mandatory. You would be able to use it to specify some conditions, for example "only available on monday's".
Here is what it looks like:
How to create a beautiful menu with the text editor:
Apply a style to your titles ("appetizers", "dishes", "desserts" for example) and center all your text. For that, select your title in the text editor and click on  in the text editor's menu, then click on
  and choose "title 1" or "title 2". Your title will be formatted with the Lobster police (the same police that it is used for the discount title in the discount feature).
Press Enter. Enter your appetizers if the title is "appetizer", press Enter between each item.
To enter a new title ("dishes" for example if you just enter the appetizers), make a separation by pressing Enter and clicking on  in the text editor menu. Then press Enter and reproduce the previous process.
These modifications won't be visible in the text editor nor in the app preview but will be well considered in the application.
Then, if you can, enter a picture for this menu and save all.
To enter a new menu, click on ![]() and repeat the process above.
and repeat the process above.
You can obtain this:

Let's go!
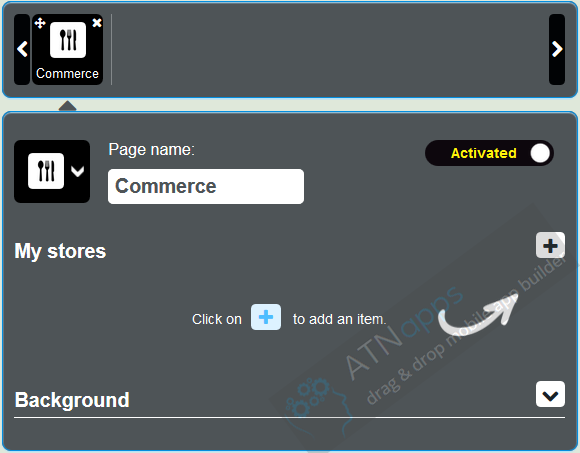
1. Create a point of sale
After having added the feature Commerce to your app, click on ![]() to add a point of sale:
to add a point of sale:
Then fill out with your store info:

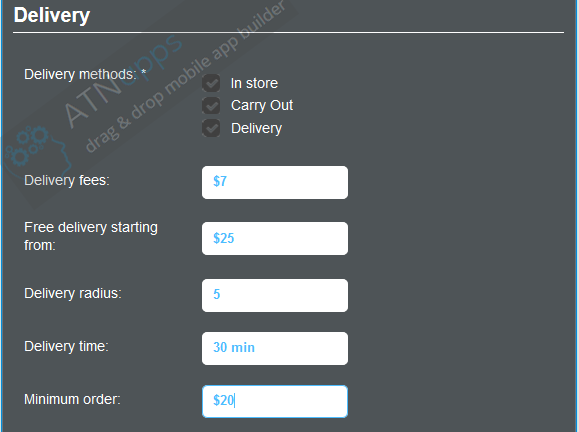
Then add your delivery options. You can choose from:
- "In store": meaning that people should come to eat/drink/whatever in the store
- "Carry out": meaning that people should come to the store to get the product and then leave the store with the product
- "Delivery": meaning that you are able to deliver them
- "Delivery fees": the cost of the delivery
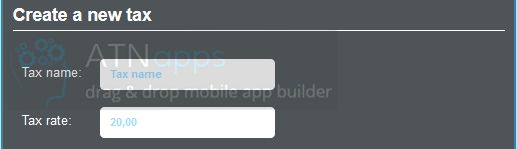
- "Tax": indicate your tax in percentage, if zero write "0", if 10% write "10".
- "Free delivery starting from": if you want the delivery to be gratis beyond a certain amount of order
- "Delivery radius": indicate the area you deliver from your store address, in radius.
- "Minimum order": if a minimum amount of order is mandatory to deliver a client
Then add your payment options. If you choose PayPal, you'll need to do some mandatory operations in your PayPal account, click here to see how you have to set up your Paypal account to enable it in your app. It's the only online payment solution you can have in your app. "Credit card" is only here to tell users they will be able to pay in the store or to the delivery man with credit card, not within the app.

Save by clicking on ![]()
2. Create categories for your product
Then go in "Catalog" and click on "Categories":
Click on ![]() to add your categories.
to add your categories.
A first one is automatically created but won't be shown to users. It's your root category but once again it will not be shown to users so you can let it like that. Select it and click on ![]() to add a subcategory (in fact, as the root category is not shown, this new category will be a main category). Add as many categories and subcategories as you need:
to add a subcategory (in fact, as the root category is not shown, this new category will be a main category). Add as many categories and subcategories as you need:
3. Create products
Then click on "products" from the main menu in "Catalog", the products page is displayed:
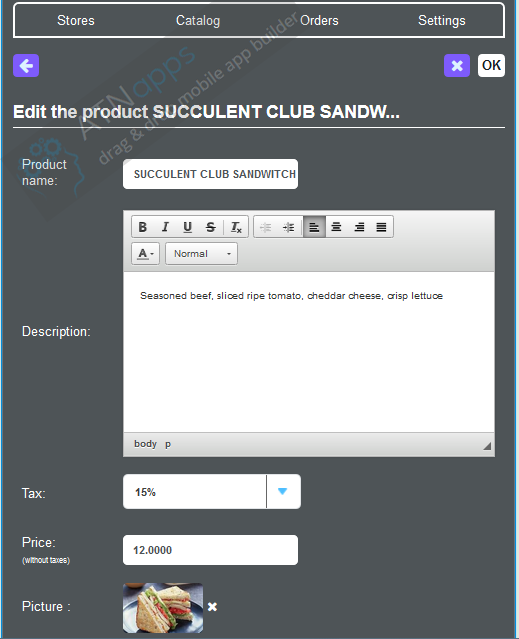
Click on ![]() to add a product. And fill out with your new product info:
to add a product. And fill out with your new product info:
You can add some options to this product. By options we mean sizes, sauces, complementary products, etc.
Here is an example with some sauces, and then we will see another one about sizes.
First, create a new options group:
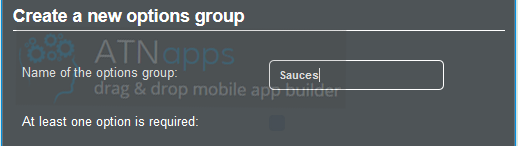
If you check "at least one option is required" the user will must choose from the sauces you offer when he orders the product. He will not be able to order without choosing from these options (that's useful when you have many sizes for a product like we will see next).
Then, in the "Add it options" section, click on ![]() to add options to this group of options:
to add options to this group of options:
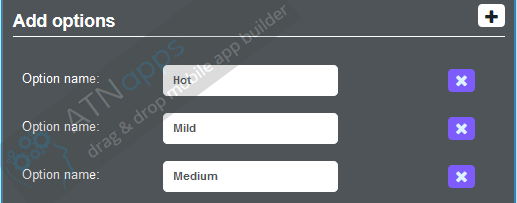
Click on ![]() to save.
to save.
Now below in your product details page you can see your options.
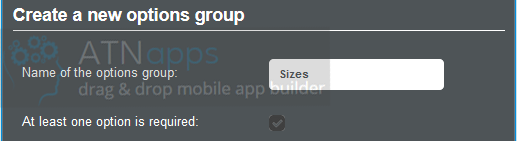
It's the same process for sizes.
Name your options group and check that at least one option is required (thus the client will have to choose a size):
Add options to your group of options:
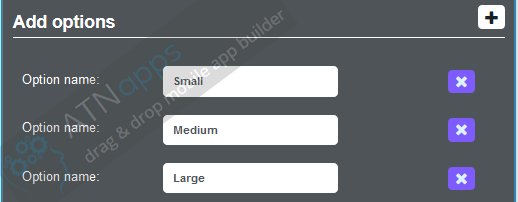
Click ![]() to save.
to save.
Then, in your details product page, check the options for this product and indicate their price.
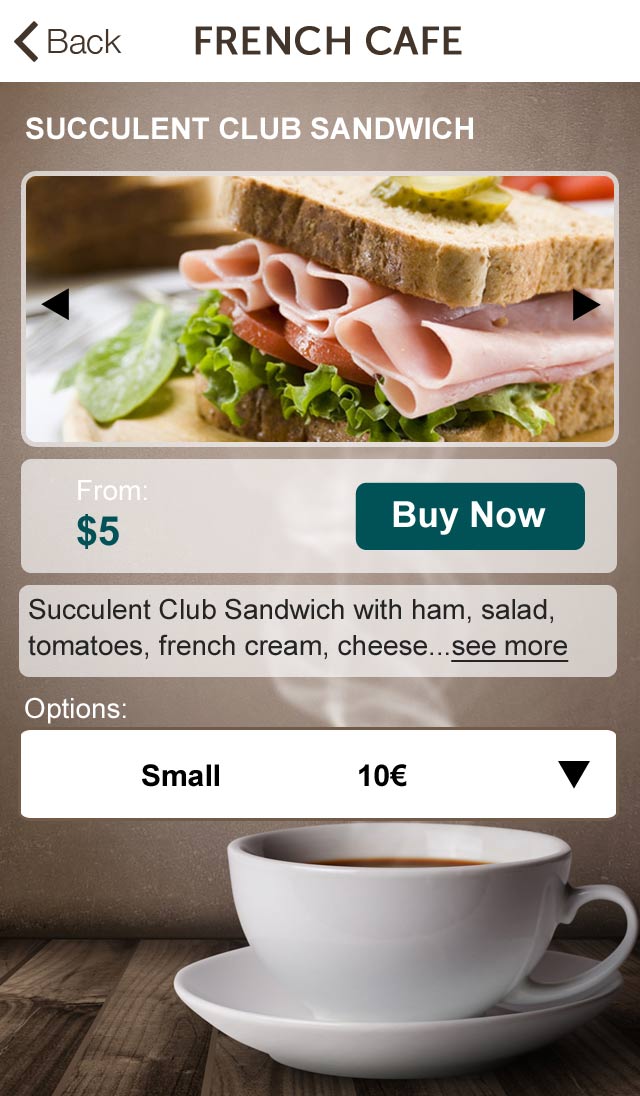
IMPORTANT: when the user choose the option the price of an option will be added to the product price you've indicated above. Meaning that if you sell a product with different sizes, don't indicate the product main price, it will be the price of your smallest size, like below in "Sizes":
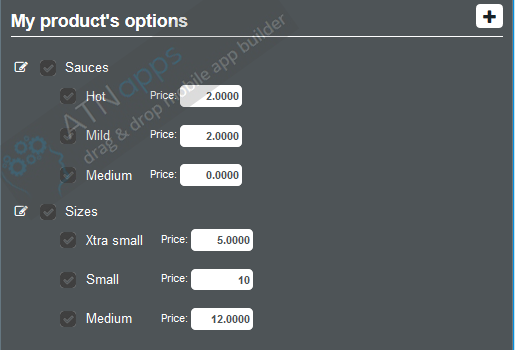
For example, if there is no product main price and if there are 3 prices for the 3 sizes, and the smallest size price is $5 (and of course if you've checked "At least one option is mandatory), the price that will be shown in the app to the user will be "From $5".
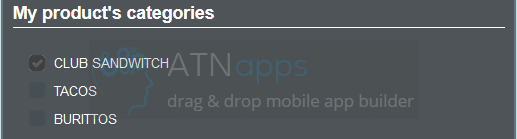
Then check the categories for your product:
And click on ![]() to save your product.
to save your product.
4. Manage
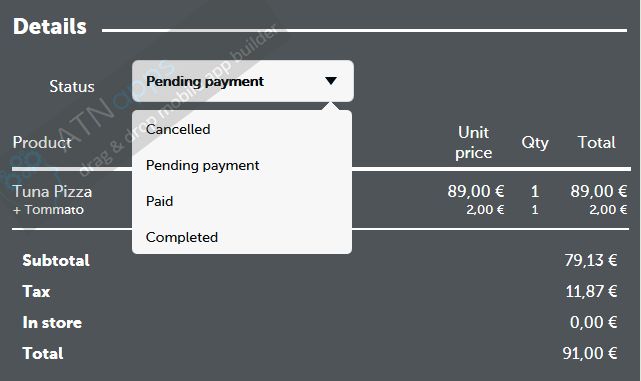
In the "Orders" menu, you will be able to see and manage the orders you receive:

Click on the orders of your choice. Then this appears:
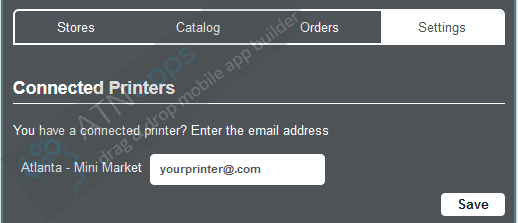
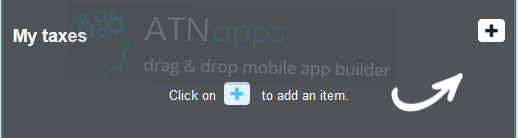
In the "Settings" menu, you will be able to link, for each store, a connected printer to your app to print orders when they arrive, and also to manage your tax rates if you have several:
That's all! Now your app can sell products!
You can obtain this:
Here is how it works:
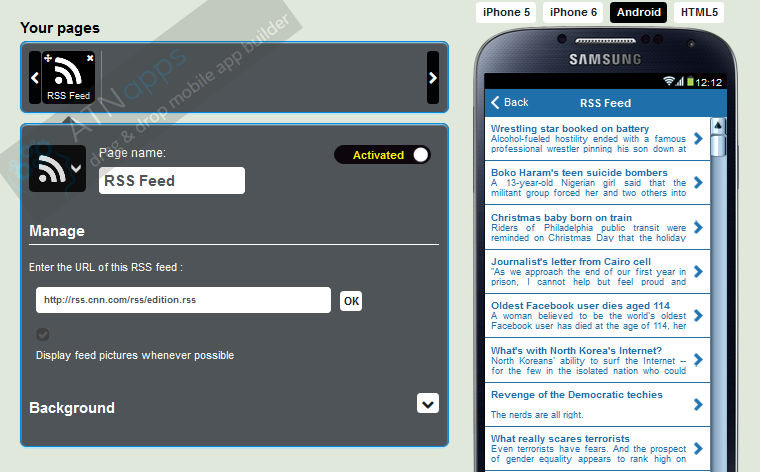
It doesn't matter if you know or not the feed link you want to integrate.
Just enter a title for your feed and then the URL of the website from which you want to extract the feed. Click
To enter a new feed, click on ![]() and repeat the process above.
and repeat the process above.
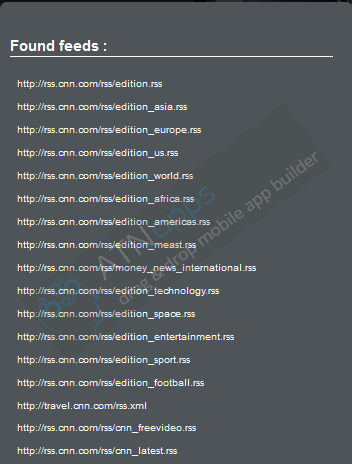
In a second case, you can just enter the name of the site you want to extract the RSS feeds. Tiger will automatically scan this website to find the RSS feeds on this one.
- Create a gallery from Picasa
- Create a gallery from Instagram
- Create a gallery with your own photos
1. Create a gallery from Picasa
The "name" field allows you to give a name to your gallery. If you have several galleries, users will have the option to choose the one they want to look at.
With the "search" field you'll be able to retrieve all photos from Picasa that are relevant to this search.
If you want to import an album from your Picasa photos on Google+, you just have to enter your Google ID in the "Search" field, johndoe@gmail.com for instance, and give a name to your gallery in the "Gallery name" field.

And the result is:
2. Create a gallery from Instagram
Instagram gallery works like the Picasa gallery. You have to enter the name of your gallery in the appropriate field and then enter your username or the one of the user you want to integrate the photos in the second field.

And the result is:

3. Create a gallery from your own photos
Give a name to your gallery, and click on "0 image" to upload photos from your computer.

You can upload several photos in the same time, just select from one folder all the photos you want to upload.
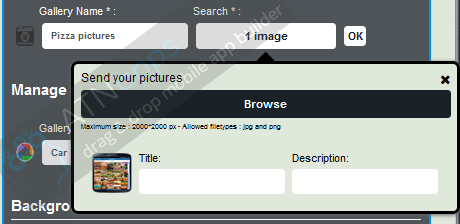
It's not mandatory, but you can enter a title and a description for all your photos.
Click on ![]() to save your gallery.
to save your gallery.
To create a new gallery, click on ![]() and repeat the process above.
and repeat the process above.
You create a thematic gallery too from other sources than the store (for example a fashion video gallery for a trendy bar).
Here is how it works, it's quite simple:
1. YouTube
Begin by giving a name to your gallery, if you create several galleries, user will be able to select the one they want to watch:

Then, in the "search" field, what you're are going to enter depends on what type of search you're are going to select:
Create a gallery with only the store videos:
You already have created the store channel on Youtube and uploaded the videos on this channel. Let's suppose this Youtube channel is called "Dominos", here is how you create the gallery:
Enter the name you want for your video gallery and then the name of the Youtube channel in the "search" field. Then choose "Channel" for "Type":

Create a thematic video gallery:
Enter the name you want for your video gallery, the keyword you want to search for in the "search" field, and choose "Search" in "Type":

Here is the result:
If you want to add another gallery, just click on ![]() and repeat the process above.
and repeat the process above.
2. Podcast
You can also integrate videos from Podcasts. To do this, you have to enter the name of your video gallery and the URL address of your video.

3. Vimeo
If you want to add a channel you have to enter the ID of the channel in the "search" field and select "Channel" in the "type" select box.
You can find the ID of the channel at the end of the channel URL. For example, for this channel:
https://vimeo.com/channels/513799 you just have to enter "513799".
For the other types of choices (User, Group, Album), it is the same process than for Channel. Just enter the ID that reads at the end of the URL. For example to import all the videos of this user:
https://vimeo.com/user24085556
enter "user24085556" in the "search" field and select "user" for type.

In this support article, we will learn how it is possible to integrate your playlists or the one of your favorite artists into your app.
To create a Music page in your app click on "Music" ![]() . This appears:
. This appears:
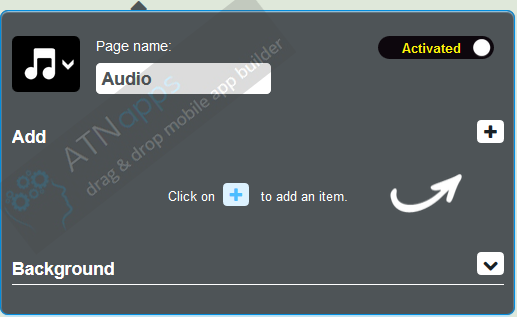
Click on ![]() to create a new playlist in this page. This appears:
to create a new playlist in this page. This appears:

Enter the name of your playlist and a cover photo.
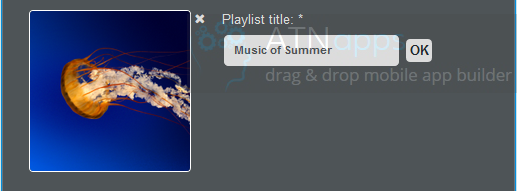
Then click on ![]() to save your choice. This appears:
to save your choice. This appears:
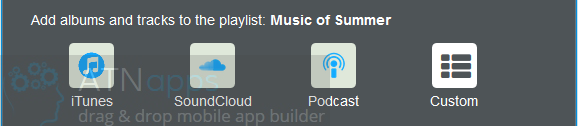
You have four possibilities to add songs and albums to your playlist:
- iTunes
- SoundCloud
- Podcast
- Custom
Let's start by iTunes.
1. iTunes
Click on the iTunes icon ![]() This appears:
This appears:

You have three possibilities to search the songs you want to add to your playlist:
- Artist
- Album
- Track
Then enter your research in the field, then click on ![]() . This appears:
. This appears:
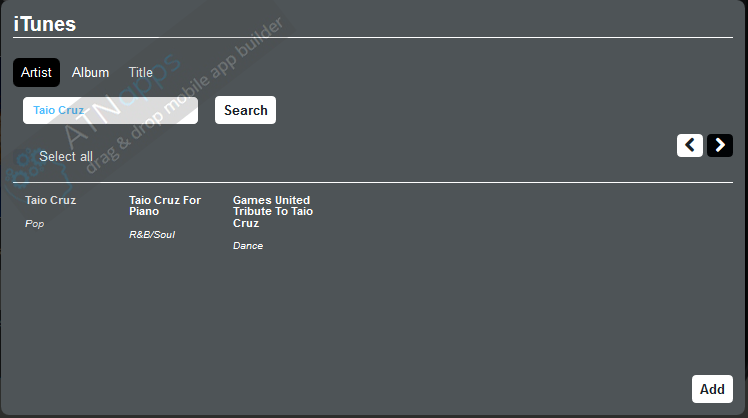
Click on the artist of your choice. Then this appears:
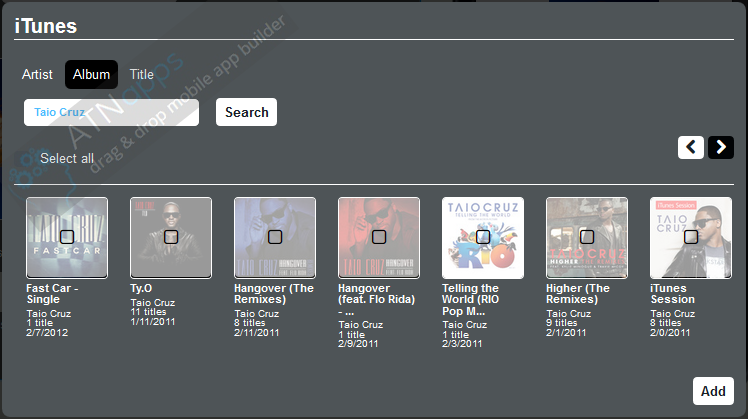
Click on the album, the track or the artist you want to add to your playlist. Once the album, the track or the artist you want to add is selected, it appears like this:

Once you have finished your selection, click on ![]() to validate your choice.
to validate your choice.
2. SoundCloud
Click on the SoundCloud icon ![]() . This appears:
. This appears:

You have two possibilities for SoundCloud:
- If you have a SoundCloud account you can add your own tracks.
- If you want to search the tracks of your favorite artists from SoundCloud
If you have a SoundCloud account:
Click on ![]()
If you want to search the tracks of your favorite artists:
Click on ![]() This appears:
This appears:

As for iTunes, you have the choice between Playlist and Track. Select the one you want and then enter your search in the field.
For example this appears:
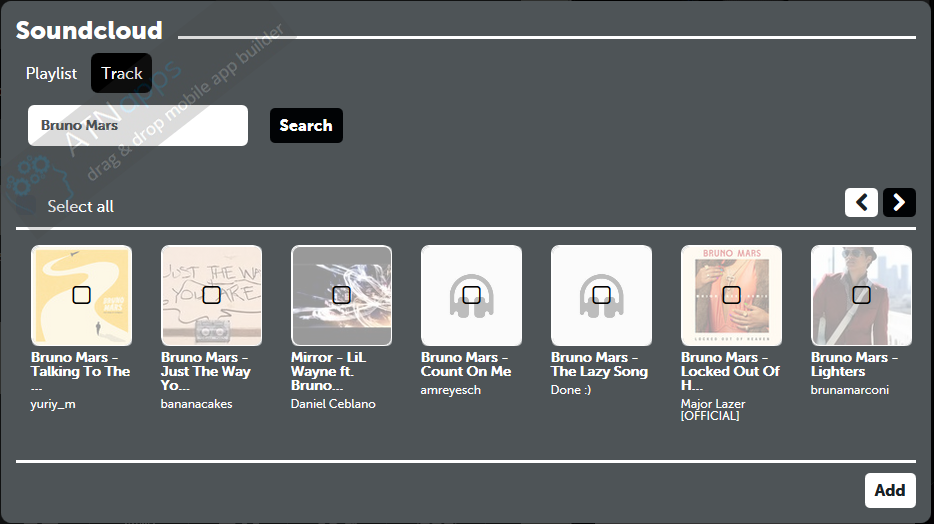
Click on the album, the track or the artist you want to add to your playlist. Then click on ![]()
3. Podcast
Click on the Podcast icon ![]() . This appears:
. This appears:

Enter the URL address of the podcast ( .xml format) you want to integrate. Then click on ![]()
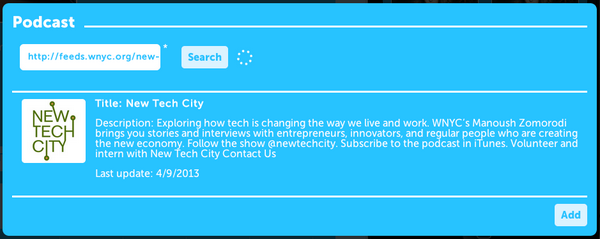
Then click on ![]() to add this podcast to your playlist.
to add this podcast to your playlist.
4. Custom
Click on the custom icon ![]() . This appears:
. This appears:
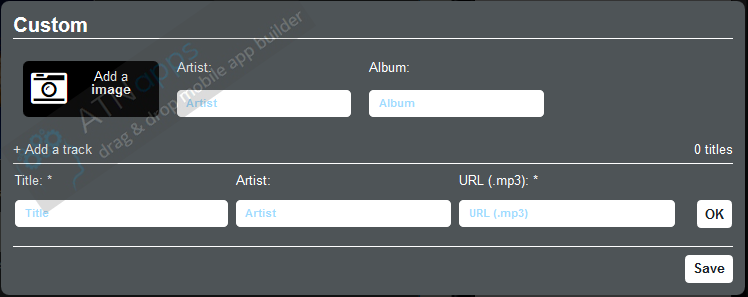
In this part you are able to share tracks you host on your own site. To integrate your tracks, enter the information needed in the fields and then click on ![]()
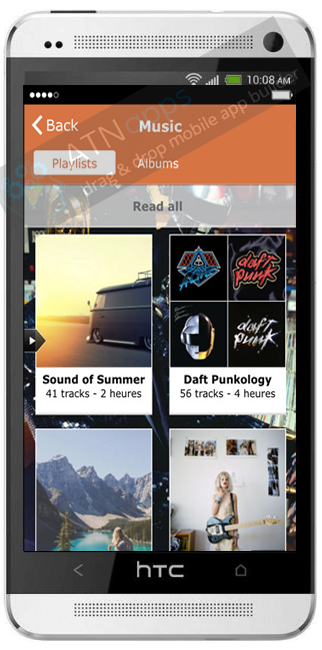
You can obtain this:

Custom page allows you to enlighten your business by numerous ways. You can write an article with a picture or not, you can publish a photo gallery and you can publish a video directly on this page.
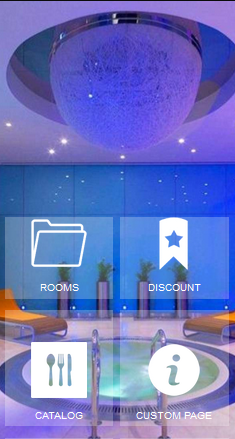
For instance, custom page gives you the opportunity to create pages like these ones:
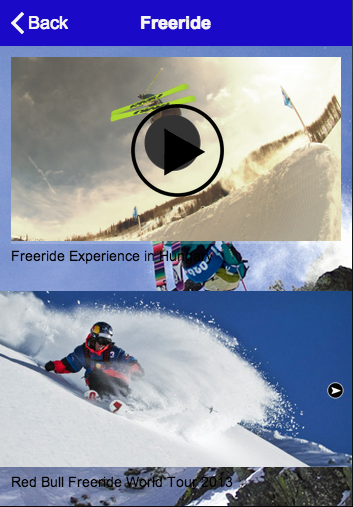
Let's see, how to create a page such as these ones. First, you need to create a new Custom page:
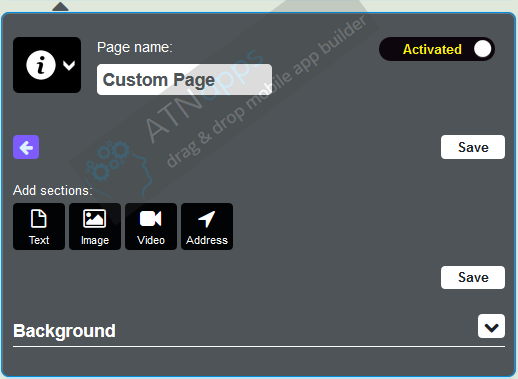
Then you must name your new page (here it will be Our Activities).
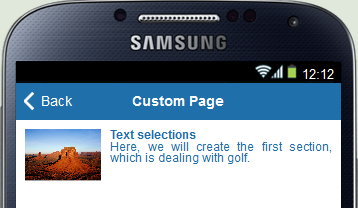
A custom page is made up of independent blocks. Thus you can realize as many blocks as you want in the same page (in the example page "Our Activities" there are three blocks: one about golf, one about tennis - which are both text sections - and one about the lake which is an image section).
1. Text Sections
Here, we will create the first section, which is dealing with golf. To do this, click on ![]()
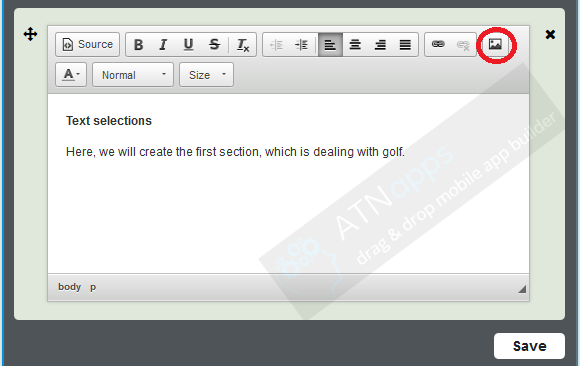
Then, insert the picture we want in this section. To do that, click on the icon which is circled in red. This icon appears ![]() and allows you to insert your picture.
and allows you to insert your picture.
When this one has been inserted, you can act on its alignment and its size:
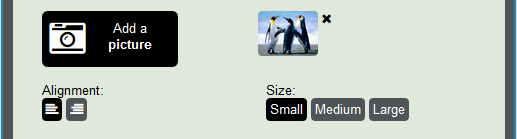
Thus you obtain this result:
To obtain the section concerning tennis, click again on ![]() and follow the process we have seen. But you must act on the alignment which must be on the right and not on the left. You can realize as many sections as you want (custom pages are made up of independent blocks).
and follow the process we have seen. But you must act on the alignment which must be on the right and not on the left. You can realize as many sections as you want (custom pages are made up of independent blocks).
More:
You can also add in your text element a link to a website or a phone number. To do this, click on the icon which is circled in red:

This appears:
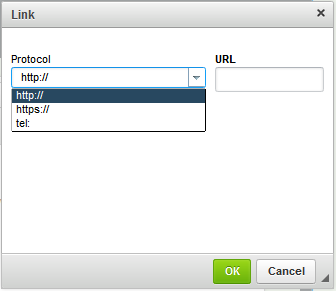
You have to choose the protocol you want to integrate "http://" if you want to integrate a website or "tel:" if you want to integrate a phone number. Then write in the URL case the link.
ex:
Website:

Phone Number:

2. Picture Sections
Creating a photo gallery is as easy as realizing a text section. To do that, click on ![]() and then on
and then on ![]()
You obtain this:
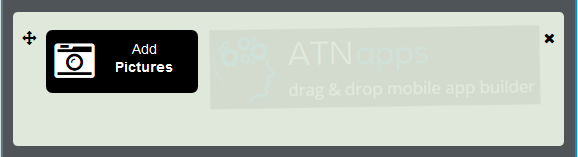
You can add a description of your picture if you want. Here again you can realize as many sections as you want, you just have to click on ![]()
3. Video Sections
The creation of a video section is as easy as the creation of text sections and picture sections. To do that, you must create a new section, click on ![]() . This appears:
. This appears:
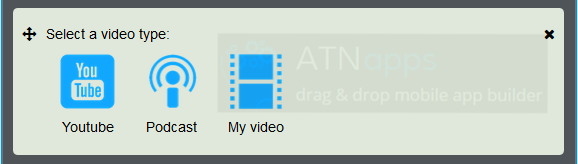
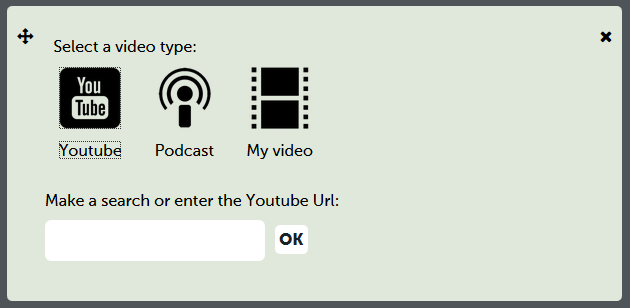
Here you have t choose the kind of video you want to integrate into your custom page: YouTube videos, Podcast videos or your own videos.
YouTube:
Click on ![]() . This appears:
. This appears:
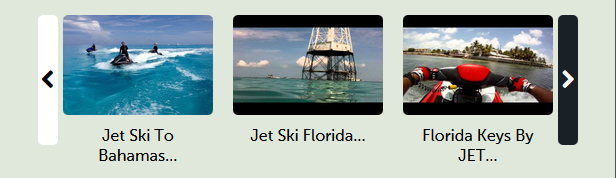
Enter your research or your YouTube URL in the field. Here I enter "Jetski in Florida" and then click on ![]() . This appears:
. This appears:
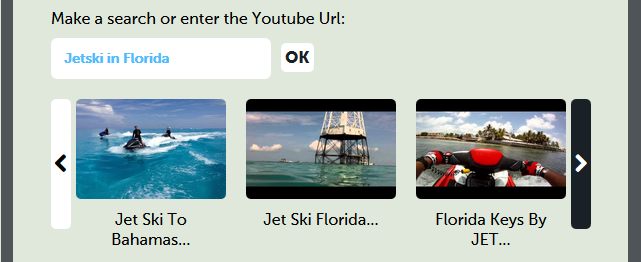
Select the video you want to integrate and then click on ![]() to save your video.
to save your video.
Podcast:
Click on ![]() . This appears:
. This appears:
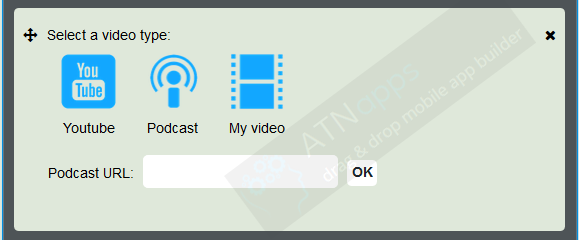
Enter your video podcast address ( .xml format) in the appropriate field. Then click on ![]() . This appears:
. This appears:
Select the video you want to integrate to your custom page. Then click on ![]() to save your video.
to save your video.
My Video:
Click on ![]() . This appears:
. This appears:
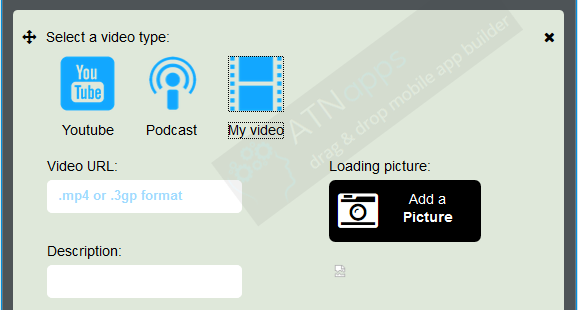
Thus, to include a video, you have to write the URL address of your video in "Video URL".
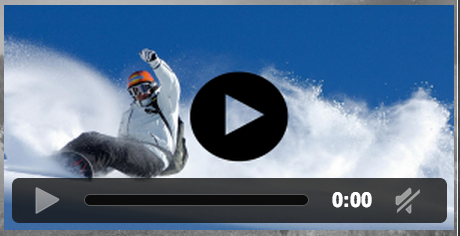
Once you have written the URL address of your video, you can write a little description of it and add a loading picture. To add a loading picture, click on ![]() . You obtain this:
. You obtain this:
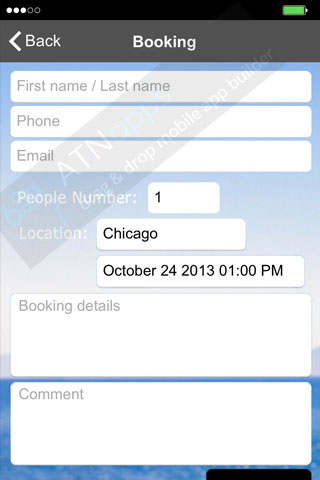
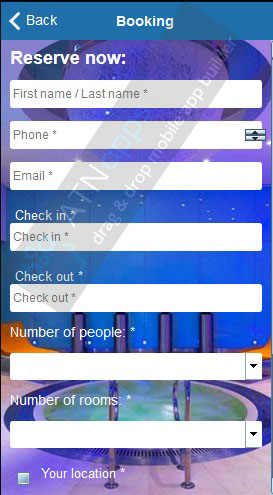
If you want to introduce this feature in your application, that is very easy. First of all, you have to click on the Booking feature:
Then, you have to click on ![]() and to enter the location of your business and the email address of the manager:
and to enter the location of your business and the email address of the manager:

If you have several businesses, you can add these businesses to your Booking feature. To do that, you only have to click on ![]() . Then, you just have to enter the location of this business and the email address of your manager. You can do this process, as many time as you want so that to reference all your businesses.
. Then, you just have to enter the location of this business and the email address of your manager. You can do this process, as many time as you want so that to reference all your businesses.
Why these information ?
The location of your business(es) is important for your customers, so that to know exactly where they scheduled their appointments.
Thank to the email address of your manager, the application will send him an email to validate the appointment.
And the result:
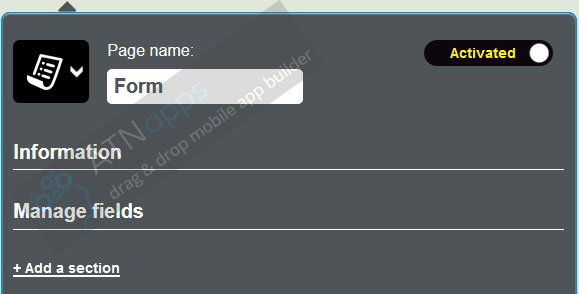
So let's see how to create a form page.
Step 1:
To create a form click on ![]() in the "Add pages" part. This appears:
in the "Add pages" part. This appears:
Step 2:
To create a first section click on 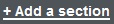 . Give a name to this section. Here we will start by "Example" to show you what is possible to do with this feature. Then this window appears:
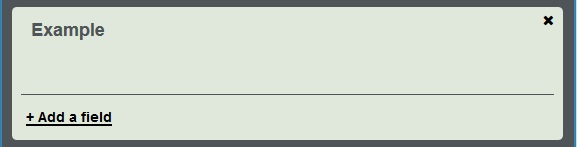
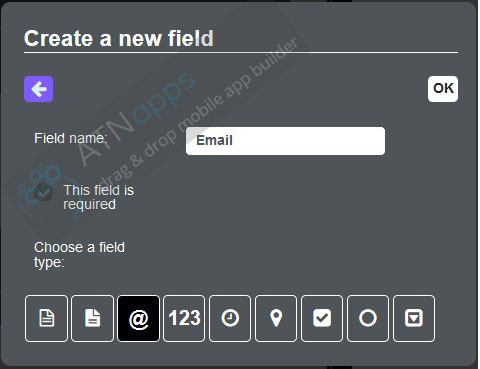
To add a field click on  . This window appears:
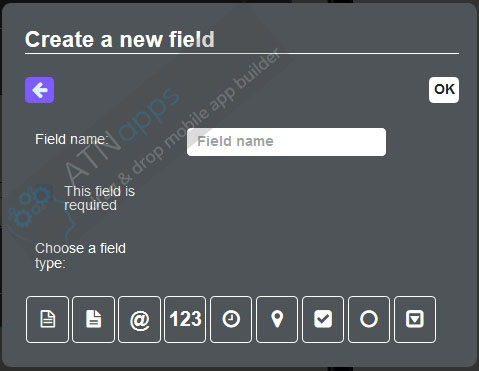
Let me introduce the different fields:
 : this field enables the user to write a short text (ex: his name...)

 : this field enables the user to write a long text on several lines (ex: a client can write his answer here)
 : this field enables the user to write his email address to contact him.

 : this field enables the user to write a number (ex: the number of people for a reservation)

 : this field enables the user to write the date and hour (ex: the hour he wants to pick up what he orders)
 : this field enables the user to indicate his GPS position when he send the form.

 : this field enables the user to select several options
 : this field enables the user to only select one option between the ones submitted.
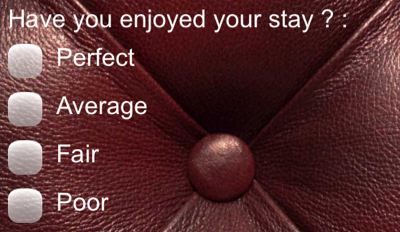
 : This field enables the user to select the option they want.
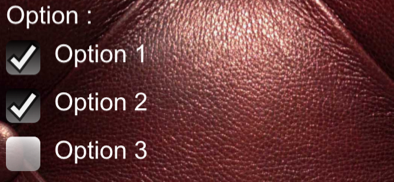
Every times you enter a new field, you have the possibility to make this field compulsory. It means that the user cannot send the form if this field is empty. To do this click here:
You can create as many fields as you want in a section. But we recommend you to well organize your form to be easy to fill by the user.
Once you have enter all the fields you want to set up, you only have to indicate the email address of the manager in appropriate box.

Some Examples:

The creation of a Folder
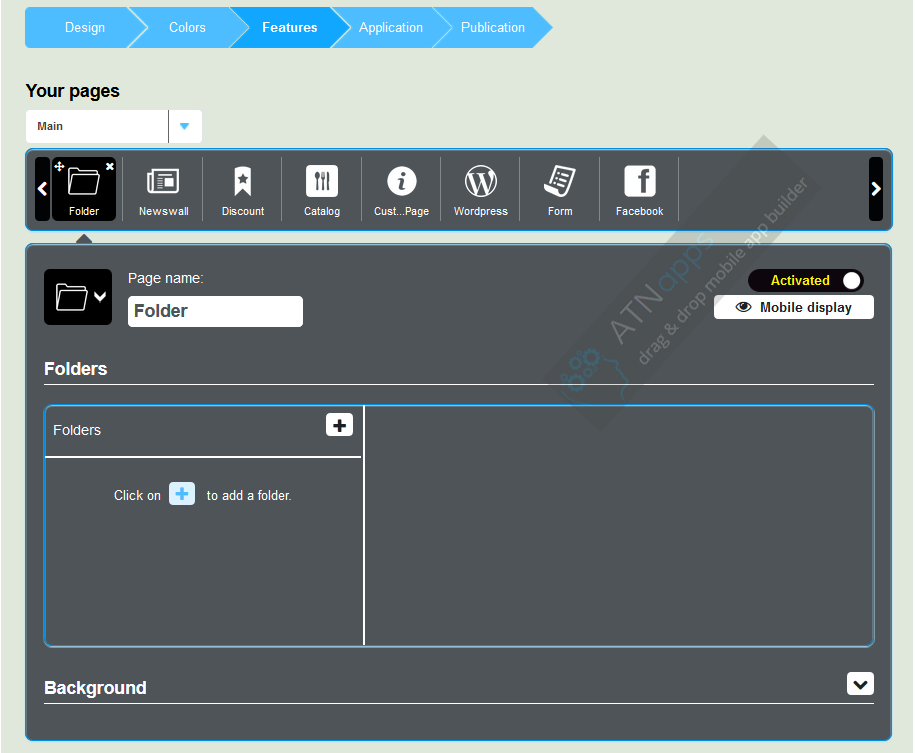
To create a folder, click on
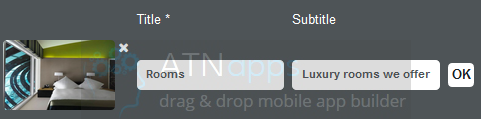
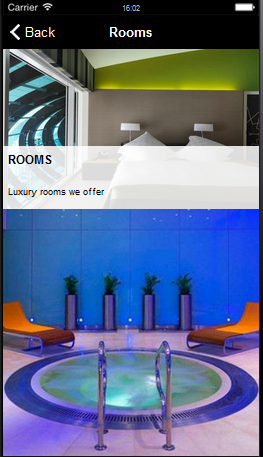
For each folder, you can add a picture and a subtitle. Here an example:
To create a second folder, you have to click on + and to fill all the cases (name of the folder, subtitle and picture). Do the same for all the folders you will create.
If you want to change the name, the subtitle or the background image, you only have to click here.

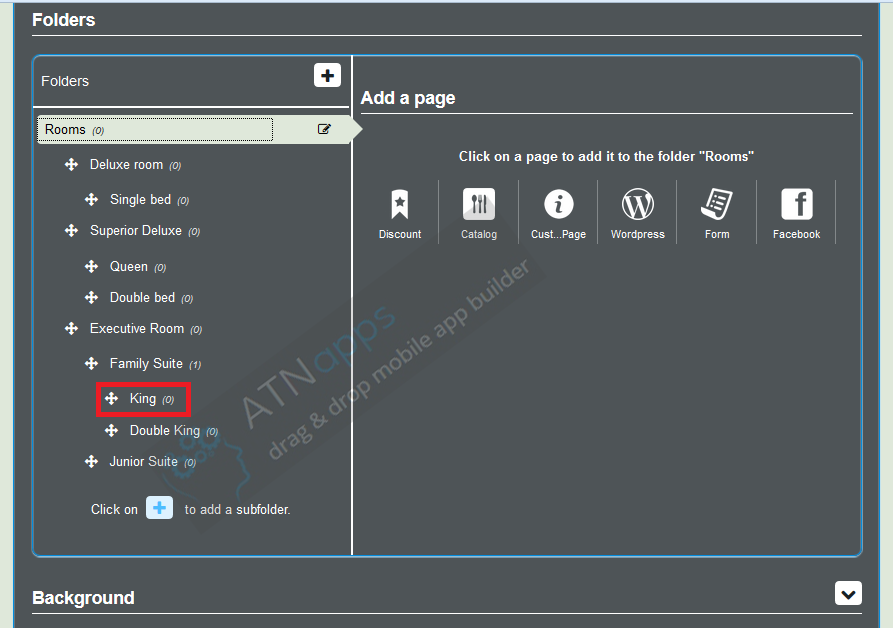
The structure
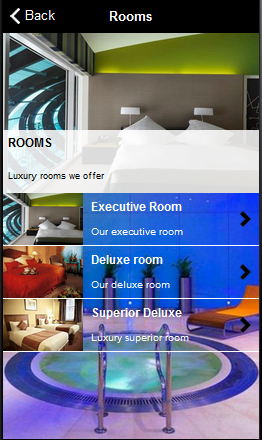
With the folders page, you can create different levels in your apps. You can fill away your pages by themes. To do this, you have to use drag and drop:
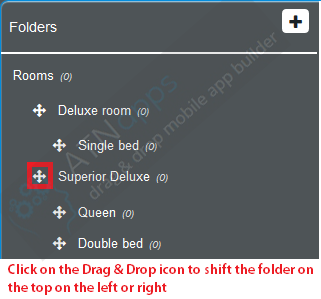
If you move the "Superior Deluxe" folder on the top, it will appear before "Deluxe Room" in the Folders. If you move the "Superior Deluxe" folder on the right, it will become a subfolder of "Deluxe Room".
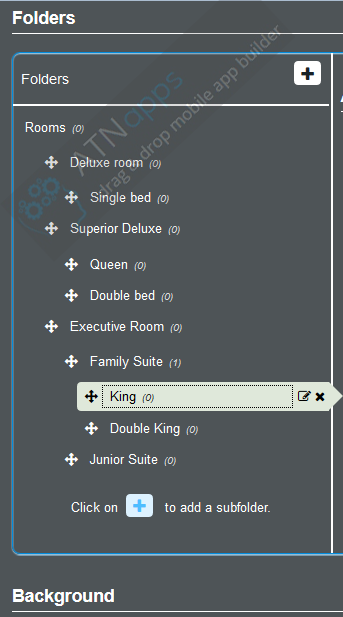
At the end you can have this kind of structure in your app. Obviously this application is quite complicated.
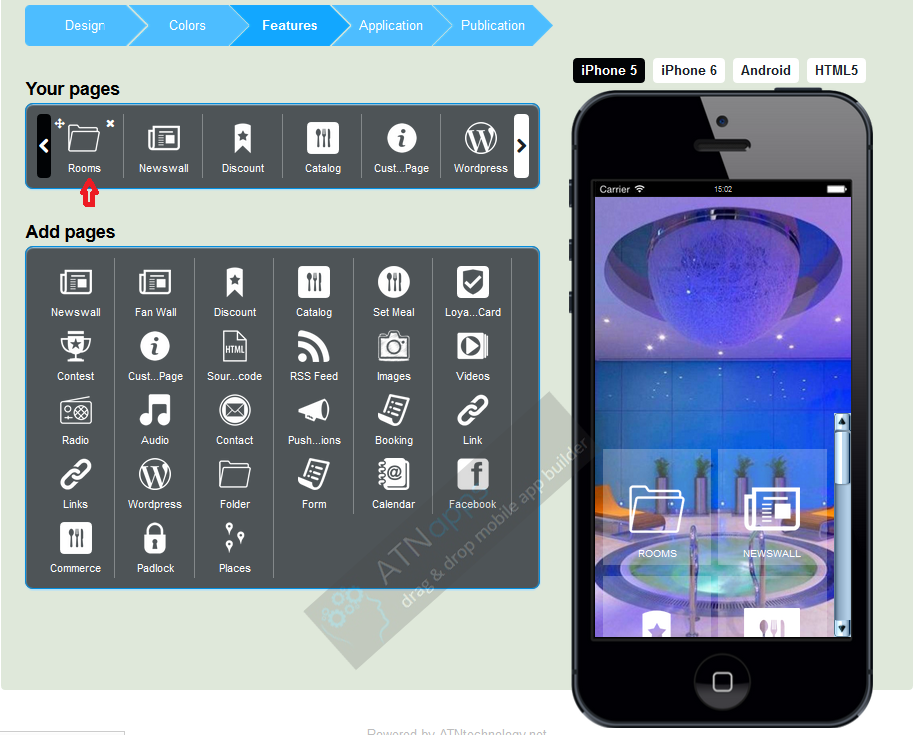
Add pages to your Folders
Note: You can ONLY add in your folders the pages you have already created. The folders page only enables you to fill away your pages.
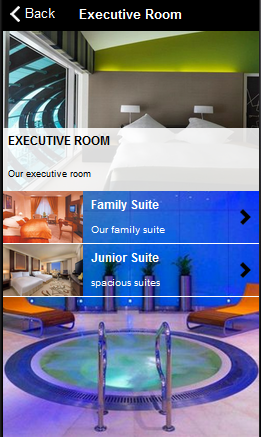
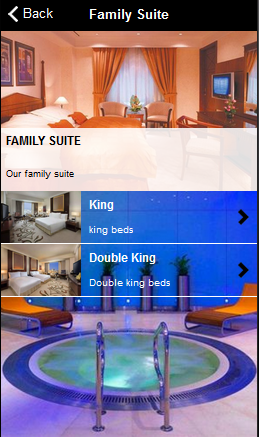
Add a page to one of your folder is very easy. First: select the folder in which you want to add a page and then click on the page you want to add in. For example "King":

Then click on the page you want to add to this folder.
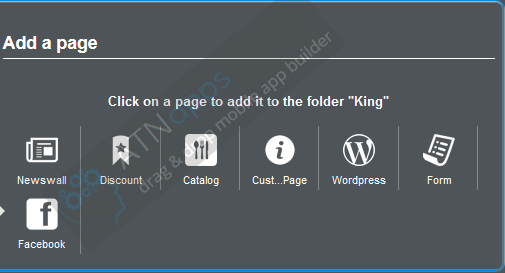
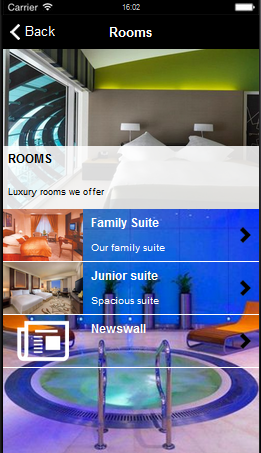
Here we are. We have added our first page to a folder. Do the same for each page you want to add. Here an example of page you can create :
Editing your pages
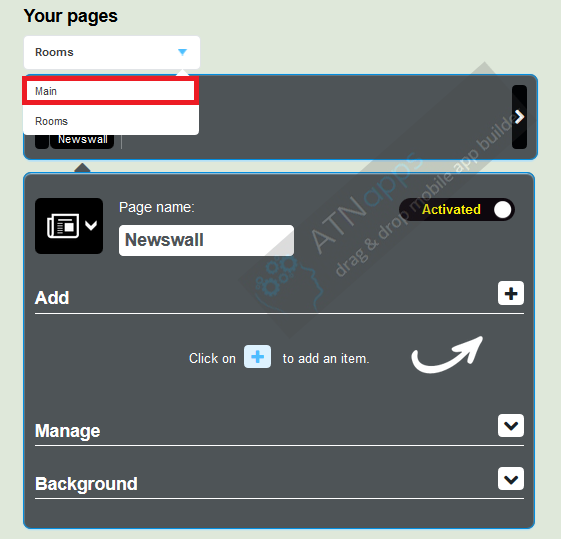
You will see, that once you have added a page to a folder, this page will not appear anymore in the main feature slider. To manage the pages you have added on some folders, you have to open the Folders page. To do this, follow this process:
- In the main feature slider click on the root folders icon, you built:
- Select the folder or the subfolder in which the page you want to manage is.
- Click on the page you want to edit.

- Once you have click on the page you want to edit, it appears.
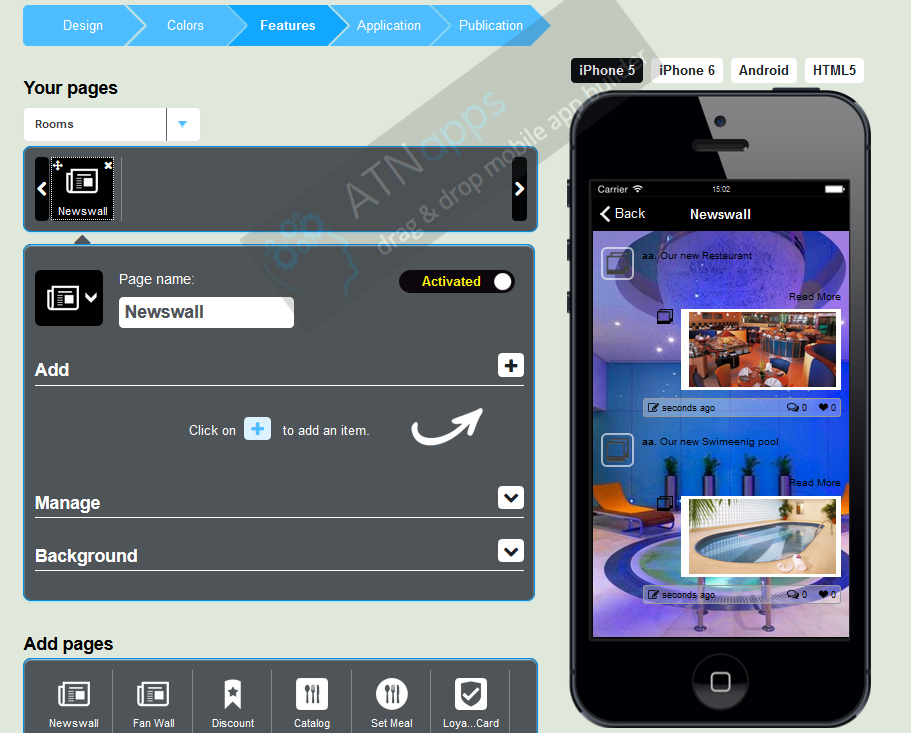
- To go back to the root folder, click on the page icon, you have just edit.
![]()
- If you want to go back to the main feature slider, click on "Main"
Removing a page from a Folder
Once you will have filled away a page into a folder, you will always have the possibility to remove it from the folder.
To do this click on the cross ![]() :
:
The page you remove go back automatically to the main feature slider.
Some Examples:
More Questions?
Contacts
ATNappsSonoma dr
Lawerenceville, GA 30045
Mail: support@atnapps.com
Business Hours
- Monday-Friday: 9am to 7pm
- Saturday: 9am to 2pm
- Sunday: Closed